
During the Walldog event in Danville, I was also treated to a Hot Air Balloon ride, but I'll talk more about that in a future post. Here is a picture of some of the crew that helped on the Balloon Classic wall.....

In this post, I was hoping to present and explain some of the equipment required to paint a large scale exterior mural. In my last post I mentioned the technique of printing copies of the art on transparencies so they could be used to project on the wall. In order to do this you need a good overhead projector. I use an Apollo 4000 overhead projector.

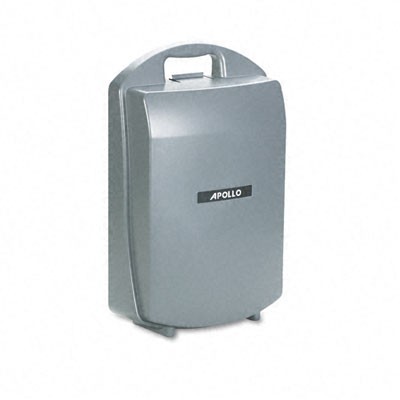
The projector has the following features:
• Combines elegant boardroom styling with top projection quality
• Features a reflective anti-glare projection stage
• Three element vari-focal lens ensures sharper focus and picture clarity
• Provides 2,000 lumens light output
• Folds to flat position in protective hard shell case for easy travel
• Includes molded handle and internal storage for power cord and transparencies
• Lamp changer prevents delays by instantly positioning a fresh lamp
• Reflective light transmission for superior light output
• EYB replacement lamp
I have used several different types of overhead projectors, but this is the best one I have found...so far!
Next up, you will need something to set the projector on while you project the image onto the wall to be painted. A few years ago I attended a Walldog event where I sketched up an idea for a projector stand and a local welding shop built one for us. They choose to built it out of square steel tubing which worked well but was a bit heavy to carry up a ladder to project off a roof. You never know where you will end up doing murals! Here is a picture of the steel version....

I decided I needed a light weight version of the projector stand, so I re-built it using aluminum tubing with a stainless steel projector platform. The entire stand screws apart at a couple different points, so it breaks down easy and fits into my car if need be. Here it is in the disassembled mode.

Here is the projector stand fully assembled...

Here is the projector and stand set up...

The main tube adjusts up by loosening the two set screws on the lower back side. The black bar sitting on the base, is a counterweight to help keep the stand weighed down and prevent tipping backwards. The four feet on the base adjust up and down which helps level the projector on curved surfaces (streets).
Next up you will need a good collection of brushes (fitches for rough walls) and a case to carry them in. I use a D-Flite polished Aluminum All-Purpose box. Which can be found here... http://www.d-flite.com/index.htm

Next up you will need a bunch of straight edges, levels, halogen lights for night work.......well maybe a list of stuff would help here...

• artists acrylic paints in a selection of colors that corresponds to colors in your preliminary design
• empty containers with lids—coffee cans, cups, etc for mixed colors
• primer (gesso)
• rollers
• roller pads
• extension handles for your rollers
• rags and/or paper towels
• drop cloths
• buckets
• brushes in many sizes
• yardsticks
• masking tape
• painting palettes or trays for mixing colors
• metal scrapers to clean dried paint off palettes
• stir sticks
• wire brushes
• brooms and shovels
• eye protection (goggles)
• ladders
• scaffolding
• paint spraying system
• air compressor
• milk crates or other sturdy boxes to store paint cans
• sun/rain protection system
• A shade tarp that can be rigged to scaffolding with a telescopic adjustable frame.
• sunscreen
• sunglasses
• sunhat,
• bug spray
• work area or table
• solvent disposal/recycle cans & funnel when there's no practical place to dispose of used solvent.
• chalk lines with extra powder
• tape measures
• plumb-bob line
• rolls of saran wrap for temporarily storing/sealing roller covers that might be needed later.
• garbage bags
• recycle bins
Did someone mention spray guns? I have a couple different touch-up guns that I use. One is the el-cheapo deluxe $40 version you find at the local hardware or home builder supply stores....that would be the blue one in the picture. The other is the SATA Centennial edition with gold plating and even a gemstone in the handle. The SATA model is mostly reseved for high-end automotive type finishes. It features a digital air pressure regulator.

And the guns have their own box with more space for non-air brushes....

For the Balloon Classic wall, we needed to reach to the top of the 40 foot high wall, so we used a telescoping boom lift and a scissors lift. I wish I had taken a few more pictures of the lifts in use on the wall but I was a bit busy painting at the time. Here is the boom lift we used and a couple of pics of lifts to get the point across.


So, load it all up and we'll see you at the next Walldog event!
