Friday, September 30, 2016

Punky Manor - Vintage Stock Car - Tribute Build

Build Exploration...Part 2


In my last blog I mentioned sketching up a few concept renderings to explore the final paint job I want to do on the Torino Tribute car.

There are many ways of doing sketches and over the past 30 years or so my technique has evolved into something that works for me. Some people might go about this process in a totally different way and that is fine. This is the fastest and most accurate process that I have come up with to accomplish my visual exploration goals.

I started drawing and sketching cars in my early teens and started hand lettering race cars when I was 16. Later in life I worked for an advertising firm where I learned to screen print my designs on a wide variety of garments. I can also hand paint automotive illustrations in a wide variety of media and scale. 

To start my drawing process I did an online search for reference images of the different views I wanted to draw. I found quite a few images of 1972 Torinos that I could modify and or manipulate for my purposes. I use these images to get the proportions correct and to speed up the drawing process. Once I get a composite image assembled, I build up each finished rendering from a basic pencil sketch.

I used Adobe's PhotoShop program to add the number, sponsors, and the tires and wheels over the photos I found online. I then print the reference image out at full-size and tile and tape the different letter sized sheets together (if final rendering size is bigger that letter size).

Here is one of the rear view images I am going to use.


And below is the same image with the number, logos, decals, and tires and wheels added.


Once I have the image printed, I can then do a transfer on to the Illustration board or whatever substrate I am going to do the final rendering on. The transfer can be done by using carbon paper or by applying graphite to the back of the printed reference image pages.

Here is the initial sketch after being transferred to a sheet of 14" X 17" Bristol and highlighted a bit with a No. 4 hard pencil. I have just started to apply marker details here as well.


Once the initial sketch is completed I use a wide variety of pencils, markers, french curves, ellipse templates, and various other tools to complete the full color version. 

Here is the rear view fully rendered....


And below is a couple of views of the front end....


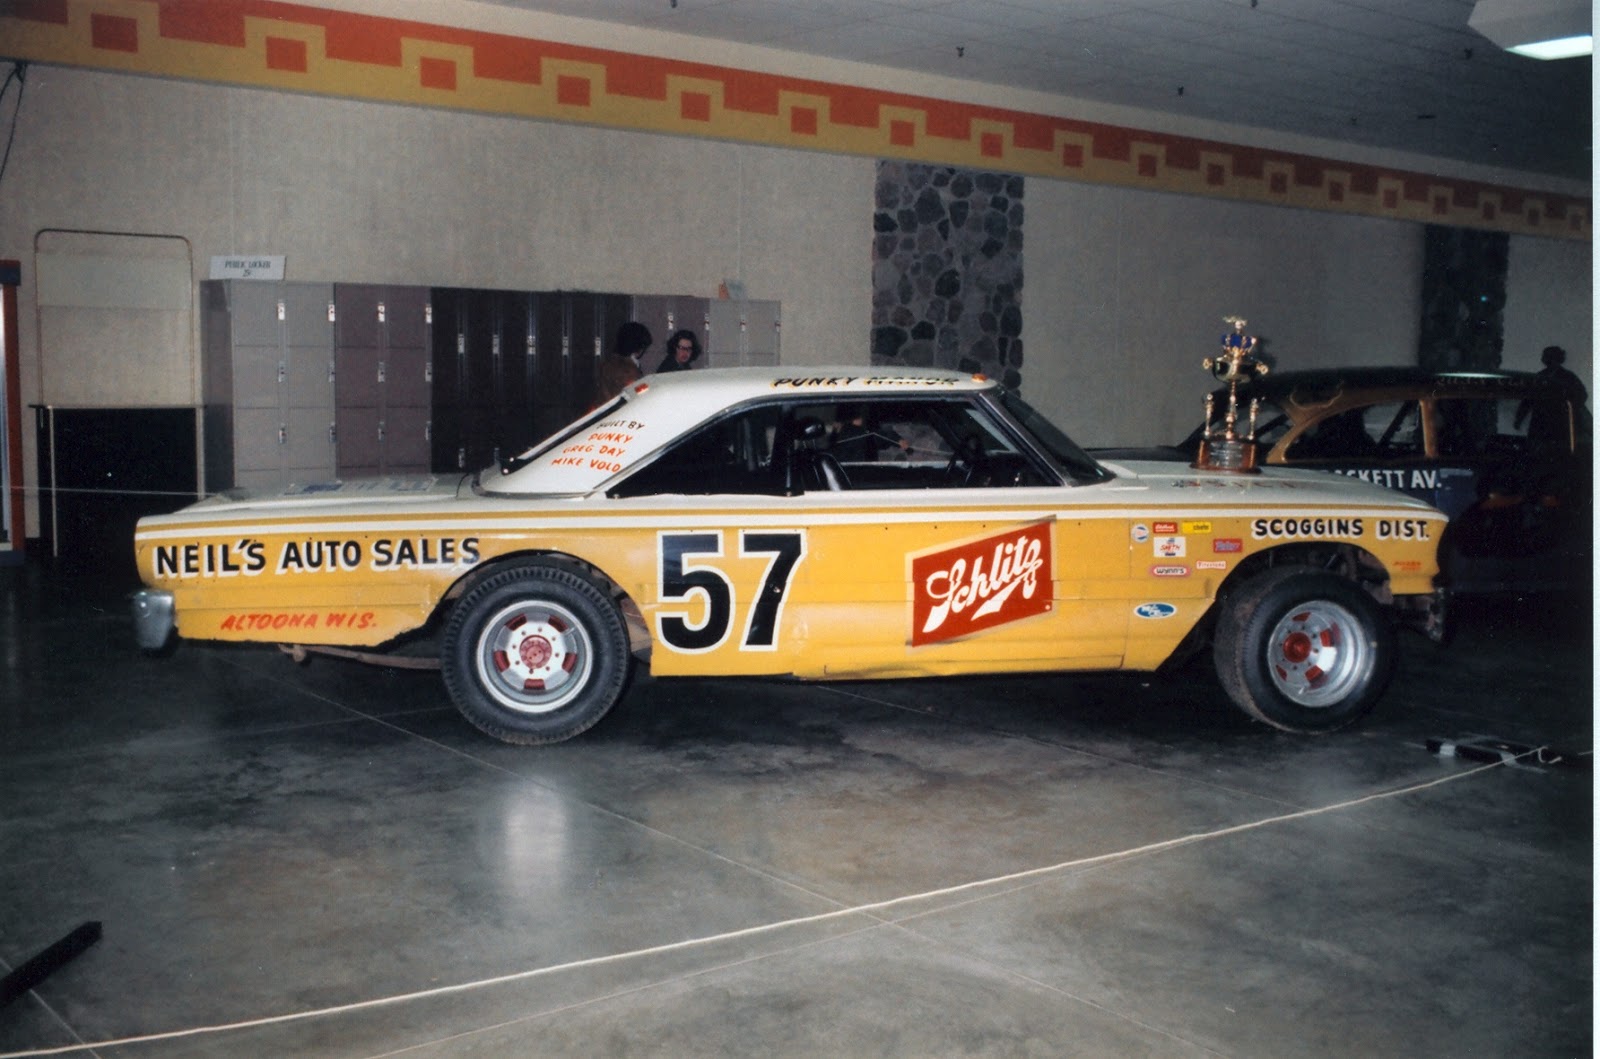
I believe I have decided to go with a composite of both the 1963 Galaxie and the 1973 Torino's paint jobs. The Schlitz logo is an icon from the 60's and 70's that a lot of people can relate to. The contingency decals also give the car the vintage race car feel. I also want to include Punky's Dad Neil's Auto Body on the deck lid.

Now all I have to do is locate a bunch of vintage racing decals and design the layout for the trunk. I also need to do some research on the original 1973 Ford paint colors.

Next up, I hope to have located the decals I need for this project and to explore a paint color sample panel.

Take care...

Tuesday, September 27, 2016

Punky Manor - Vintage Stock Car - Tribute Build

Build Exploration......Part 1


I am the kind of person who likes to do a fair bit of planning up front when I begin something new. When I start organizing for a trip or vacation, I look up maps, I check out where to eat, who to visit, and what there is to see and do in the area. 

It is the same when I start out on a design project. I like to create a road map that points me in what is hopefully the most appropriate direction. In this case, it is much easier to explore ideas with pencils and paint, then it is to do it with thousands of dollars of parts and equipment. 

There are certain elements of the Punky Manor Tribute Torino that I am pretty set on including in the project. A Big Block Ford engine (390, 427, 428, 429, 460 cubic inch), 180 degree headers (a.k.a. crossover headers), exhaust pipes out the passenger door, a 4-speed transmission, and a Frankland quick change rearend would be nice as well. 

But there are certain things that I wanted to explore in more detail. One of them is what the paint job on this race car would look like. I only have a few pictures of Punky's Torino to use as a reference. He didn't really have much for sponsors on his car for the 1974 season, so it made me think of the car he ran the previous year.

For the 1973 racing season Punky built a car for what was then called the Hobby Stock class. He picked a 1963 1/2 Galaxie Fastback or Sports Hardtop. The Fastback roofline was added mid-year to improve looks and make the cars more competitive on the Nascar tracks.

Punky also picked a 1963 model year Ford because in order to enter the end of the year Late Model Feature races, you needed to have a car no more than 10 years old. He won his first trophy that year at the local Mall's Race Car Show for "The Best Looking Car". So I started to think about adding elements from the 1963 Galaxie to the Torino Tribute Car's paint job. 

Below are the two cars I am referencing, 1963 Galaxie top, 1973 Torino bottom.


First thing I wanted to figure out was how I was going to do the number. I am guessing that the 57 number was probably hand sketched right on the Torino and then painted in? 

I have about 2500 fonts on my computer and I have a few books with vintage hand lettering samples in them, but I could not find anything similar to the style of those specific numbers.

I use a design program from Adobe called Illustrator to create what is called vector art for this type of work. Vector art is basically an outline which can be scaled to most any size and it will retain the line quality. A bitmap image is made up of small dots that look like a jumbled mess when they are enlarged too much.

I located a font that was somewhat similar to the one on the car and made a few modifications to get it looking close. I then created the red outline and made the drop shadow fall in both directions, so the numbers look like they are facing forward on both sides of the car.

There is a sign makers rule that you should not use the color red directly next to the color black. There should always be a space or outline between them to prevent the two colors blending together,especially at night.

In this case, I tried the space between the colors but it seems to look too different from what was originally on the car. I think I am pretty set on the number style that I have put together below. 


The only other elements that I can see on the photo of Punky's Torino was the cubic inch on the hood and the flag decal on the fender. The engine size 427 c.i. is painted on the hood but those engines are hard to find, so I will figure out what to paint there once I find the engine I am going to use.

I did a search on the internet and was able to locate and purchase a set of the flag decals that look very close to the one on the front fender of the original Torino.


Once I had the elements of Punky's original Torino paint job figured out, I started to wonder what it would look like to add the contingency decals and the Schlitz Logo from the 1963 Galaxie's paint job. So I decided it might be a good idea to do some sketches of the car to explore the overall look.

Next up I will cover how I go about doing concept sketches or renderings...take care


Tuesday, September 20, 2016

Punky Manor - Vintage Stock Car - Tribute Build

Parts Hunting....


Quite a few years ago, I restored/modified my 1969 Camaro. Even back then it was fairly easy to find either aftermarket reproduction parts or the used parts that I needed for the project. I think I could have bought nearly all of the parts needed to build a '69 Camaro from scratch.

Perhaps that is why I thought locating parts for my Torino Tribute car would be fairly easy? I had no idea how few aftermarket parts were available for the 1972 Gran Torino Sport. So the search began.

At the very least I needed to find some replacement sheet metal for the body of the car. There had been some panel repair done, a few pieces of the front end were missing. The rear bumper was in pretty rough shape. I also need to find a drive train, and hope to locate a Big Block Ford Engine and 4-speed setup (still searching for those).

Where to start....

To begin the search, I headed over to Ebay. I did a search for 1972 and 1973 Torino's, and Ranchero's and saved the searches so I would be notified daily of new parts being listed. Then I started doing searches out on "OneCraigs.com" which lets me search everything listed on Craigslist nation-wide on one page. Then I started doing searches in local junkyards.

Most of what I found was pretty high priced because it was intended to be sold to people restoring a Torino. I do not need high quality parts because I am building a dirt track race car. Then again, I don't want to spend hundreds of hours doing repairs just to make something presentable.

First Item I located was the right front Fender Extension. Found this item on Ebay, stripped it down to bare metal and fixed the small dings. Followed that up with a couple coats of white primer. 


Next up, I discovered an all Ford junkyard over in Hastings, MN which is only a 25 minute drive from our home. Joe's Auto Sale's has been specializing in vintage, rebuilt and new Ford parts for over 50 years.

My wife and I drove out there one Saturday a while back and spent a few hours walking around. She was busy taking reference photos for her artwork and I was busy trying to locate several Torino's, Wagons and Ranchero's. 

I managed to find a 1973 Ranchero that had a pretty decent set of doors on it, so I made arrangements to come back with tools and pull them off.


The doors were on a Squire Model Ranchero, so they had the wide trim pieces running down the sides. I stripped the doors of everything I didn't need (glass, crank mechanism, hinges, & mirrors), but they were still quite heavy.

After getting them home, the doors needed to be stripped of paint and all the inner metal and jams had to be removed to leave only the exterior panel. The Squire trim was held on using clips which required two rows of big holes down the length of the door.

A variety of hand tools were used to strip the door of their excess "dead weight". I used a 4 1/2 inch grinder with a thin cut-off wheel to do most of the cutting. There were a couple spots where I had to use a sawzall (reciprocating saw) with a bimetal blade. I left a bit of the inner door jam lip around the shell in order to maintain some strength. I will make final cuts and adjustments once I am ready to replace the rest of the sheet metal.


Here is the excess metal that I cut off the doors and rear bumper. The doors measure 4 feet - 8 inches long and were quite heavy until I trimmed them up. The unwanted scrap metal was then deposited at the local recycle station.


After removing all the exterior and interior paint, I cut out large steel discs and welded one on the back side of each of the trim holes. Once that was completed I ground the weld flush with the front of the door and then ran a dual action sander over them to flatten the repaired areas out even more.


After much grinding, sanding, a bit of spot putty, and a couple coats of sanding primer, 
shot a final coat of white primer on to prevent oxidation while I gather up more body parts.


Joe (at Joe's Auto Sale's) also had a few bumpers laying around for a '72 Torino, so I dug through the pile and picked out the best rear bumper I could find. It has one small dent but I can push it flat using a hydraulic press.


Well, that's what I've managed to find for the 44 year old race car so far. I have a line on a few other parts, but they are a 6 1/2 hour drive away, so I will need to make arrangements to drive down and pick them up. More on that when the story develops.

Thanks again for stopping by. If you have any questions, please drop the in the comments section below. And if you have any Big Block Ford engines sitting about, please let me know!  Take Care!


Thursday, September 15, 2016

Punky Manor - Vintage Stock Car - Tribute Build

My First Torino Build...


Sometime in 1974 I built my first model of Punky's Gran Torino Fastback stock car. It was a 1:25 scale model kit that I most likely bought at our local dime store.


I should start this story out by explaining how I would end up in Altoona, WI helping on Punky's race car.

Usually at the end of my school year, (at one of the earliest races of the year) Punky's Mom Joanie Manor would see me in the pits after the race and invite me to come stay at their house in Altoona. Punky's race car shop was directly next to Punky's Dad's (Neil Manor) Used Car lot and Auto Body shop. 

Joanie would say to me, "Come stay at our place and we'll take you racing!" So I would pack up a little bag and go stay with the Manor Family and either hang out in the body shop or help on the race car. I was only 13 at the time, so help was limited to certain things. I will share some of the things they did let me work on in future posts.

During one of my stays that year, I was building the above Torino Oval Track Racer model and needed to paint the plastic body. 

I went to Neil and asked if he could paint the car model the same color as Punky's race car. Neil pointed up at a can on a shelf in the shop and said, "right there is the paint He used on his race car, you mask it off and I'll paint it." He also told me that we would need to apply a clear coat (used on Corvettes), so the paint wouldn't melt the plastic body.

So Neil painted it up and I painted on some numbers and his name on it.

I wish I could say I still had that model car but I do not. Unfortunately I sold most or all of my model cars when I was trying to raise money to move back to the Midwest from Idaho. That is another long story, too long for and mostly unrelated to this blog.

Later on in life I started building models again. My daughter Jacque was born 8 years after Punky died and she had only seen pictures and heard stories. So I made it a goal to build a scale model of every one of Punky's race cars.

I started that goal by building the model cars in the same order as he built the real ones. I purchased another Torino kit and started the series. This time I mixed the yellow paint color the best that I could. I also added some sponsor names by making my own water-slide decals.

Below are the results of my "2nd" attempt...


When I set out to design or build something, or do most things, I like to have an idea where I am headed. Luckily I have the ability to see a vision of the destination before I get there. 

I think I learned some of this from my Father, he used to do a rough drawing of some of his projects. I also have a degree in Industrial Design, so I have been trained to follow this method of development. Working with a scaled version or sketching, allows me learn what to do and more importantly, what not to do.

Hopefully this up front exploration will help me save time, money, and refine my project before I make full-sized mistakes!

Thanks for checking in....my next blog will explore some full-size parts....take care
       

Friday, September 9, 2016

Punky Manor - Vintage Stock Car - Tribute Build

The Driving Force...


There is usually an underlying reason or set of circumstances that fuels the passion that drives our creative endeavours. In the case of this Vintage Stock Car - Tribute project, it is years of fond memories from my childhood.

My Dad's side of the family (his Nephew, Neil Manor specifically) was involved with cars and racing since I was very young. I remember as a young kid visiting Neil's Auto Body in Altoona, WI and looking over the cars he was fixing and the Stock Car that they were building or already racing each week. It was the early 70's and Neil was running Chevrolet Monte Carlo's in the Late Model Class in the Eau Claire, WI area. 

Neil Manor was the owner of these cars and he had some pretty recognizable names who drove his cars. Phil Prusak and Red Steffen were the two that I remember pretty well.


But it was Neil's son Punky (Neil Jr.) Manor that really inspired me to love stock car racing and cars in general. As close as I can figure it, Punky started racing in 1972 when I was 11 years old. 

He started out his career building and driving Ford race cars. His first car was a 1959 Ford Galaxie using the number 9. By the photo below, it looks like he was off to a good start. 


In Punky's second year he moved into the Hobby Stock Class and built a 1963 1/2 Ford Galaxie Fastback. He had originally picked out an older model year Ford, but it was suggested that if he were to get a car no older than 10 years, he could race it in the big Late Model championship race at the end of the year, so he went with the '63. 

He ended up winning the Best Looking Stock Car at the Eau Claire, WI Mall race car show that year even before he started racing it.


I've alway really wanted to find a 1963 1/2 Ford Galaxie and build a tribute of his Hobby Stock, but haven't been able to find one yet. I was still pretty young when he was running this car, so I don't remember working on this car very much at all. Below is a picture of the two number 57's in battle at one of those end of the year races...


But it's the next year, Punky's first year in the Late Model season, that I remember best of all. The year was 1974 and Punky built a 1973 Ford Gran Torino Fastback to run on the dirt tracks of Northwest Wisconsin as well as other tracks in the area. 


I have several great memories from the Torino and that particular season of racing. I will shares some of those stories as I progress through the build of this Tribute Car Project. 

It is my objective to recreate the Torino Late Model pictured above. I may include some of the graphic elements of the 1963 Galaxie when I do the paint job, but I'll figure that out as I move forward.

After the 1973 season, Punky switched over to drive Chevrolet Camaro's. Most people would probably remember him driving these cars, but I have special memories from when he was driving in the Fords!


There was a certain charm back in that era that seems to get lost a bit on the modern dirt track cars. We used to sit in the grandstands closest to the pit entrance road, at the first race of the season, and wait to see what showed up to race. Corvettes, Mustangs, Challengers, what were they bringing to race with this year?

Unfortunately Punky's racing career was cut short by a highway accident November 13, 1979. At only 26 years old, it was a devastating loss for the Manor Family and his many race fans and friends. Personally, it left a very large void in my life that could not be filled. 

As I grew up, I never seemed to be in a position to build my own race car and go racing, as much as I wanted to. So I guess this Tribute race car build will give me the opportunity to build a stock car from that era, and to keep the memories of Punky alive. 

I also have a Grandson who will turn 6 soon and I wanted him to see first-hand what these cars were all about. I'm hoping It will give me the opportunity to share old stories with him while we work together.

So, this is what is driving my passion for this project, I hope you will follow along to see how it all turns out. Hopefully I can create a few fond memories for my Grandson along the way.

Thanks and take care... 


Thursday, September 1, 2016

Punky Manor - Vintage Stock Car - Tribute Project

Race Car - Project Appraisal...


My last post described the hand-lettered paint job I did on the Corvair dirt track car for the PInkala's. Now that I have that part completed, it's time to look over the Torino and make an assessment of what will be required for the upcoming tribute build.

I went down to clean out the car, shoot some pics and to make a mental list of needed items. I must warn the reader up front that some have suggested that I over think things a bit. Others might try and tell you that I am a perfectionist. Not sure where this comes from, but I do tend to focus on the details. You can draw your own conclusions as we go along. 

Punky Manor Memorial

On my first walk around, the Torino looks pretty complete. There is a decent roll cage inside, a fuel cell, aluminum racing seat, gauges, coil adjusters on all 4-corners, chrome wheels with asphalt tires. An engine and transmission was not included with the car.  


The sheet metal is pretty decent but the car has seen a few laps so there a few panels that will need attention. The passenger side seems to have had quite a bit of repair done and will need some "new" tin! The problem with that statement is that the car is 44 years old and I will soon find out that parts are not that easy to shop for.


The right side front fender extension and headlight bezel were missing, so I will need to find replacements.  


There were a few extra parts inside the car as well. The rear bumper is tucked away inside there but it had taken a pretty hard hit on the right side. 


Now the mental parts list starts to kick in. Big Block engine and 4-speed, new sheet metal, vintage racing wheels and tires, paint job, lettering, car hauler.....wait, I need to get the car somewhere close by to be able to work on it! More on that in future posts.

For now, I need to start small and begin picking up parts and pieces as I go. When I started to restore my 1969 Camaro, I made a complete parts list and it was very overwhelming. Small steps are the way to go for now on this one. 

Till next time, take care