
Fabrication - Coming to a close...
I was recently walking around the Tribute Torino when I started to count the custom fabricated parts that I have built and installed. I quickly went up to 50 different parts on just a quick inspection of the interior. This made me wonder, how many custom fab files do I have on my computer? I just did a tour through the master Torino folder on my computer and came up with 130 separate fabricated part files. I'm sure I have a few more than that floating around on portable thumb drives as well.
Having to create all these custom parts has helped me me develop a fairly efficient fabrication process. Here is the basics. I do a quick paper pattern, which I cut out or just rub over the mating part, or I just draw from scratch using a 2D drawing program. The next step is to vectorize (or create an outline file) of the paper drawing. This is done by scanning the drawing into my computer at 100% scale. I then bring the image I scanned into a program called Adobe Illustrator. In Illustrator, I use the drawing tools to create a 2D outline of the part which can then by cut out on a laser, CNC controlled plasma cutter, or a CNC router.
Perhaps I can better explain the fabrication process using a part from the "Ford" toploader 3-speed transmission. The transmission for this project has provided me with several challenges along the way. The following description is for just one piece of that puzzle. The part I am highlighting here is the bracket that will hold the shifter on the transmission.
But first I need to explain why a custom part was required. Through a co-worker, I purchased a vintage 3-speed Spark-O-Matic shifter. The shifter was purchased back when 10,000 Auto Parts sold off their inventory and shut down the business. Apparently they used to take certain products out of their original boxes and vacuum wrap them to cardboard so that customers could see what they were purchasing. The store name and date of this particular wrapping job were written on the back of the package.

But first I need to explain why a custom part was required. Through a co-worker, I purchased a vintage 3-speed Spark-O-Matic shifter. The shifter was purchased back when 10,000 Auto Parts sold off their inventory and shut down the business. Apparently they used to take certain products out of their original boxes and vacuum wrap them to cardboard so that customers could see what they were purchasing. The store name and date of this particular wrapping job were written on the back of the package.


So this shifter is about as period correct as I could hope to find. A hurst shifter would be nice, but this is what I had to work with. As you can see in the photo above, there are various "universal" fit brackets included in the kit. As this is going on a dirt track race car, I wanted the shifter to be mounted as solidly to the transmission as I could get it.
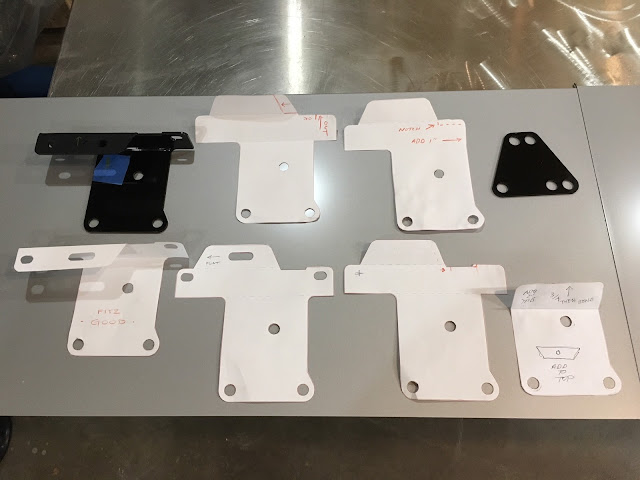
I started by laying out various paper patterns to figure out the correct bolt pattern. I then created several different pattern versions trying to find the most secure way to attach the shifter lever to the mounting holes on the transmission.
I started by laying out various paper patterns to figure out the correct bolt pattern. I then created several different pattern versions trying to find the most secure way to attach the shifter lever to the mounting holes on the transmission.

The black parts above were my first test pieces in plastic. Once I determine which paper pattern is fitting the best, I use that vectorized line drawing to cut and bend a plastic version using the same thickness as I intend to cut later in steel.


Finally, I use a CNC controlled plasma cutter and a hydraulic press brake to bend the mild steel version into the correct shape. Here is the final metal version bolted in place.


I fabricated my own battery box using the method I described above. These boxes are available at most any high performance or racing parts suppliers and are fairly inexpensive. Most of the new ones come with a lot of round holes in them, which would not have been done or available back in the mid 70's. So I made several different versions until I decided on the x-brace style. I think it ends up looking more like something that would have been around in 1974 or a factory battery box.

Below is an Adobe Illustrator 2D drawing of the dash panel and gauge bezel.

The finished dash gauge panel (below)...this one ended up in a different configuration than the drawing above. More often that not, several different designs are explored until I find the best fit. In this case the steering wheel drove where to locate the tachometer.

Here is both the gauge panel and the dash panel being test fitted in the race car.

I did this same process on over 100 hand fabricated parts over the last few years. I did a count recently and came up with over 750 individual computer files related to the 100+ parts produced.
Here is a 2D drawing of the rear wheel tub side panel...

And here is the fabricated part installed in the race car...


Next up, I hope to start showing some of the body work that I have been working on. I most recently have been ordering all the parts to rebuild the front suspension. Until then, take care.