Thursday, December 21, 2017

Punky Manor - Vintage Stock Car - Tribute Build

Discoveries - A learning experience


I have made several discoveries along the way so far on the Torino Tribute build. Some were interesting parts that were found on the "Boat" motor I purchased. Another was the 3-speed transmission that I bought from "Bob the Turkey Farmer". 

Beyond learning the difference between an "FE" and a 385 Series Ford engine, I have learned a quite a bit about the 460 cubic inch engine I purchased. When Punky ran the original Torino in the 1974 season he had 427 cu. in. painted on the hood. I was recently told that just because that was painted on the hood, it didn't mean that's what was under the hood! I was 13 years old at the time and I remember helping to put together an engine back then that they said was a 428 cubic inch.

Ford's FE engines were built from 1958 to 1976 and came in several cubic inch configurations. The 352, 360, 390, 406, 410, 427, and 428 were all FE engines. A lot of these engines were "used up" for racing back in the day. I tried to locate an FE for the Torino but they were fairly expensive when found. It was also suggested that I might consider finding and using something other than an engine that someone might need for a restoration.

So I focused my attention on finding a 385 Series engine. During my search someone mentioned looking into Marine engines built by Ford. I happened across two of them in the area and decided to buy the one I found up near Dassel, MN. 

The 385 Series engines were sold from 1968 to 1997 and came in 370, 429, 460 cubic inch configurations. Ford also offered this engine series in the Cobra Jet, Cobra Jet RamAir, and Super Cobra Jet versions.

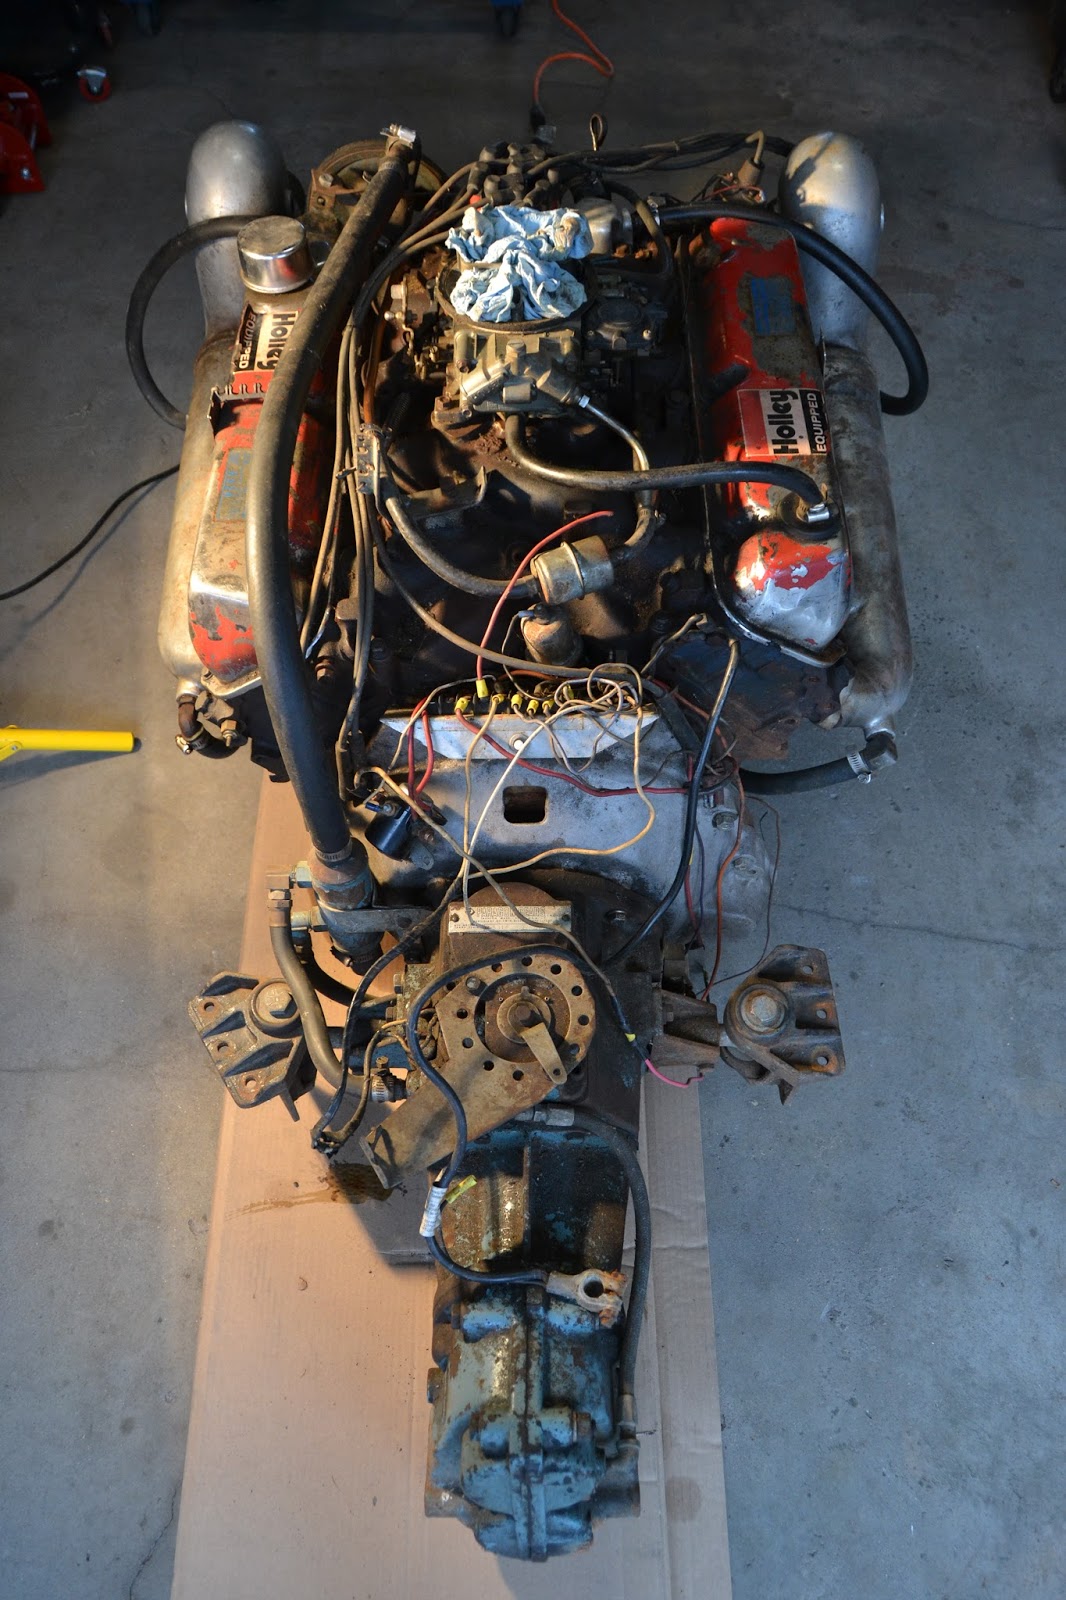
Below is an image of the Hardin Marine (H320) 460 cu. in./320 H.P. that I bought for the Torino build.


During the process of cleaning and disassembling the engine I learned how to identify the various parts using the stamped I.D. numbers. My first discovery was the cast iron intake manifold. The part number D0OE-9425-C was the number used on 429 Super Cobra Jet cars.


Since I had already decided to run an aluminum intake manifold instead of the heavier cast iron version, the 429 SCJ part was sold.

The next interesting find was located on the back of the engine. When I picked up the 460, it had the original V-Drive marine transmission bolted in place. The 2-speed (forward and reverse) transmission was bolted to a Nicson aluminum bellhousing. A clutch plate was bolted directly to the flywheel, no pressure plate was used. 


Because of this rather bizarre configuration, I had my doubts about using the flywheel from this engine. That is until I looked up the casting number. The flywheel was identified as part number C9AE-6380-C used on the 1970 - 1971 429 Cobra Jet and Super Cobra Jet Mustang or Torino & the 1969-1970 Boss 429 Mustang. From the prices I've seen these listed at, it is a fairly sought after and valuable part!


The most interesting discovery in the part search and find process was on the 3-speed manual transmission I bought from Bob the Turkey Farmer up in Aitkin, MN. Bob had no idea what this transmission had been pulled from. I brought it home, cleaned it up and spent some time trying to identify what it came out of.

Something was very odd about this transmission and it took me a while to figure it out. It looked like a typical Ford "toploader" 3-speed but the I.D. numbers didn't show up in any searches. I also could not find any other Ford 3-speeds with this type of tailstock.


The transmission above is indeed a Ford built transmission, but it wasn't put in a Ford vehicle. The 3-speed above is called a Dearborn M13 and was the standard offering in 1966 - 1969 Pontiacs. The FoMoCo stamped toploader was used in intermediate sized Pontiacs including the GTO because the 3-speed Muncie transmission could not stand up to the higher displacement engines being introduced at that time. Most people opted to have the Muncie 4-speed option installed, so these 3-speeds are fairly rare. It is said to be one of the toughest transmissions ever installed in a Pontiac.

Next up, I am looking at how to get vintage racing tires mounted and installed. Take care for now!

Thursday, December 7, 2017

Punky Manor - Vintage Stock Car - Tribute Build

Design Details - getting the "look" right


In order to comply with the following rule; "Keep it looking like a car", I will be installing all new body panels on the Torino. When I took over ownership of the race car it had already had numerous repairs done to most of the body panels. The front end was missing parts, the bumpers were bent up and in rough shape, and the GTS hood had been replaced with a flat hood. So I will be getting the car put back together to better resemble it's original shape and condition.


Chrome Bumpers - in Stock Position. For this particular rule, I will be replacing both the front and rear bumpers. The bumper rule also states that it can be "reinforced to provide safe attachment and proper protection". 

Below are some images of the process I went through to prep the rear bumper for installation. After locating a "new" rear bumper at the local salvage yard, I pressed out the dings. I then fabricated an inner roll bar structure to provide attachment points for the bumper and protect the rear of the car. The rear bumper is bolted to the tubular support so that it will be easy to remove and repair or replace if it gets damaged on the track. 

I found a handy site online that has a "Tube Coping Calculator" that makes it relatively easy to mark the "fish mouth" area to grind off when fabricating roll bars. Here is the link:


I will now be able to fabricate the additional tubing needed to attach this assembly back into the original location on the car. Note that all original mounting hardware has been removed and discarded. The tail light and license plate areas will be covered by riveting on pieces of aluminum.


The original front bumper was covered in very fine white cracks in the chrome and it appears to have a slight twist. Once again, I found a replacement at a local yard. I will go through a similar process as mentioned above, to mount and reinforce the front bumper.


In order to achieve a period correct "look", the valve covers and other engine components need to be from the right era. As you can see by the series of photos below, I have put a lot of thought into how the engine should look. I could easily (and at greater expense) go out and buy a brand new pair of valve covers for the Torino's 460 engine. Instead I am going to try to recreate the look of the 1970's era dirt tracker.

The Modern valve covers shown (below right) would look out of place on a vintage race car. The black finish is way to recent. The chrome aftermarket covers all come with 2 lines formed in the top flat surface. Ford racing and billet aluminum are also too recent.

The examples of valve covers (below left) are a few that would have been used back in the mid 70's. The blue painted steel covers are stock and have the Ford logo embossed in them. The finned aluminum covers came on the 429 Cobra Jet and Super Cobra Jet engines and are a bit hard to find and can be expensive.  

When I bought the 460 cu. in. Hardin Marine engine, it came with a set of original chrome valve covers that had been painted (over the chrome) by Hardin. They also came with a chrome finish decal printed with the engine specifications in blue ink.

I decided it would be best for this build to restore the original chrome valve covers and recreate the decals. By the way, I contacted Hardin Marine and they said the division that built the 460 engines has been shut down for over 20 years, so no decals available there! To recreate the decal, I took a photo of the original, vectorized it (made it into line art) and had my sign shop friend print a half dozen on his Gerber Edge Printer. The valve covers themselves have been stripped of old paint, dents pressed out and have been sent off to Keystone Ind. to be re-chromed.      


Another issue I had to address was the entire front of the Hardin 460. The marine engine was equipped with marine water pump, non-stock alternator brackets, water pump cover, and a nest of hoses connected to the marine water cooling system. 

I removed all the marine parts and set out to locate the automotive versions of the front pulleys. As I mentioned in an earlier post, I have decided to install a factory alternator to charge the battery. I managed to locate a complete set of alternator brackets up in Canada for the cost of shipping! I cleaned them up and painted the metal parts with self-etching metal primer.

I did find a stainless steel flex fan inside the race car when I brought it home. According to the part number, it looks to be the original Torino part. I am now on the hunt for the water pump pulley, aluminum fan extension and a power steering set-up.   


Hopefully I will have new tires and wheels to cover in my next post. Until ten, take care!

Monday, November 27, 2017

Punky Manor - Vintage Stock Car - Tribute Build

Aesthetics - details make the difference


In my last post I mentioned the rules and safety guidelines that I will follow while building the Vintage Late Model-Tribute Torino. Those same rules and guidelines are also going to drive the overall "look" and design of the car. 

There are several major points in the rule books that I would like to cover in the next couple of posts. Some of these points are related to the major evolution of dirt track racing that has taken place since 1974. I will also cover some of the finer details that I am working on to keep the Tribute car as authentic and period correct as I can. 

Just a little disclaimer I will toss in here. Some people might not agree with some of my views on the topic of modern vs. vintage race cars, I am just putting this information out here as a reference for how I am building this particular car. And it also might explain a bit of why I am building this car as well.

One sentence that really stuck out for me in the 1982 Red Cedar Speedway - Official Rules was; "Keep it Looking like a car".  There were several rules (back in the era when Punky raced the Torino), that kept a race car looking like a factory car.

A few of them are as follows;

1. Visual stock 1972 through 1982 U.S. made cars only.
2. Cars must have complete front fenders & hood with no sharp edges.
3. No hood or roof spoilers. Rear spoilers and fins may not be more than 42" total height from ground and may not extend past the sides of the body or past the rear bumper. No extreme roof line variations allowed.
4. Chrome Bumpers are required and may be reinforced to provide safe attachment and proper protection, but must remain in stock position. Nothing can be sticking out the ends.
5. All cars must have a neat paint job and must have identifying numbers painted on the top, the right, and the left sides. The drivers name must be printed (paint) in 4" letters on the right side of the car. Numbers shall be in contrasting colors to the car's paint. It is recommended that all cars have a light colored paint job.
6. There must be a complete set of floor boards in the driver's compartment.

Back in the early 1980's the WISSOTA Promoters Association was founded with the intent to offer uniform rules for the promoters and drivers involved in the Late Model division. Soon after it decided to do the same for the Modified class. So the rules and guidelines I mentioned above were pretty much retired. The era of "Keep it looking like a car" ended with the introduction of the Wissota rule changes.

One of my favorite things about going to the races in the 1970's was waiting to see what types of cars were going to show up at the first race. Might be a Mustang Fastback, Dodge Challenger, Chevelle, Nova, Barracuda, Javelin, Falcon, or maybe even a Corvette.

In 1974 my favorite car was the yellow and white Number 57 Ford Torino, driven by Punky (Neil Jr.) Manor.

The images below show the transformation from the 1970's dirt track cars to the modern Wissota Late Models.


My major goal in building the Punky Manor Tribute Torino is to inspire people who see the car to be transported back to the mid 70's and remember the great old race cars of that era. I can only achieve that goal by keeping the overall build of the race car as period-correct as possible. 

This type of "attention" to detail can add quite a bit of research time and end up raising the cost of the build, but to me it is worth the extra effort and expense.

Here is a partial list of items that I am planning to apply to the build;

1. No base coat/clear coat (2 stage) paint will be used - Single Stage Paint Only. Base-coats were not even developed in 1974 - I can spot the difference, so I will be painting the Torino with Acrylic Enamel single stage paint. 
2. No vinyl lettering will be applied to this car - The only vinyl going on the Torino is the small product decal stickers that Punky used on his Galaxie in 1973. The rest of the car will be hand lettered using enamel paint.
3. No Modern racing wheels. If you look at the photos above you will see that the 70's cars have painted steel wheels, not polished aluminum or chrome with round holes.
4. Engine components and accessories will be as stock as possible. No aluminum brackets, mini starters, no modern intakes or polished carbs, no electric fans, oil coolers, or aluminum radiator.
5. Vintage tires to be used for shows - I have a set of McCreary racing tires that I will use for shows and parades. On the Track I will most likely run American Racer dirt tires.
6. No rear spoiler. Did not come on the car and wasn't used back then. 

Below are images showing vintage era parts on the left and modern racing equipment on the right. 


In my next post I will point out some of the specific parts I am using on the Tribute Torino and why they make a difference. Take Care for now. 


Wednesday, November 15, 2017

Punky Manor - Vintage Stock Car - Tribute Build

Safety - following the rules


Time to cover the safety gear I will need to install and or wear in the Torino Tribute race car.

My intention is to eventually race the Torino in the Northern Vintage Stock Car Racers Club events. They have their own rules for Full-Bodied Late Models that I will need to follow. In addition, I was able to get a copy of the 1982 Official Rule book from the Red Cedar Speedway in Menomonie, WI. The '82 rules seem to be very similar to what I remember were the guidelines in 1974, when Punky raced the original Torino.

Here are a few of the rules and guidelines that I need to follow to run the Tribute car in the NVSR club races;

1. Snell SA-2005 or newer approved helmet with face shield and in good condition. 
2. SFI rated fire suit, gloves and shoes in good condition. 
3. Approved fuel cell properly mounted in car. 
4. Racing seat belts in good condition less than three years old.
5. Six point roll cage with a two bar minimum on driver’s side. 
6. High backed race seat that extends above head. 
7. Front window area screened for driver protection. 
8. Driver side window nets for full bodies.
9. Window openings allowing exit from both sides. 
10. Batteries mounted secure and away from driver. 
11. Electric disconnect switch marked and easy to reach.
12. Electric fuel pumps wired into oil pressure switch. 
13. Fuel shut off marked and easy to reach. 
14. Drive shafts and weights numbered and painted white. 
15. Working brakes for four wheels and one wheel shut off allowed. 

I would also like to build the Tribute Torino so it follows the rulebook from the era that the original car was raced, the 1974 season. Here are a few of the main rules I will be following while I build the car;

1. Roll bars must be installed in all cars and are to be of pipe at least 1 3/4" outside diameter (the present cage will be updated to meet the 1982 specifications).
2. There must be a complete set of floorboards in the drivers side.
3. All cars must have a driveshaft hanger near the front of the driveshaft made of metal at least 1/4" thick and 1" wide.
4. Nerf Bars - One bar will be allowed on each side made of 1 1/2" outside diameter pipe or square tubing or 1" X 2" rectangular tubing. No sharp edges will be allowed.
5. Chrome bumpers are required and may be reinforced. Bumpers must remain in stock position.
6. Cars must have complete front fenders and hood with no sharp edges.
7. No hood or roof spoilers. No extreme roof line variations allowed. Keep it looking like a car.
8. All cars must have a neat paint job and have identifying numbers painted on the top, the right and left sides.

Below are most of the items that either have been purchased or will be purchased in the near future.
  
In order to be safe while racing the car, I will need to invest in some protective equipment. 

The most expensive part of that equipment is the helmet. Helmets can cost anywhere from a couple hundred dollars up to a few thousand dollars. I have decided to go with a basic white Bell full-face helmet, similar in style to the one Punky used back in the 70's. 

In picking out a racing suit, I have to decide on the level of protection that I need and what the rule book requires to race. The standard for measuring the safety level for a racing suit is the SFI foundation Specification 3.2A. A driver suit that is certified to meet the SFI spec has been laboratory tested and has passed the requirements of that test.

 Basically the higher the rating number, the longer the driver can be exposed to both direct flame and radiant heat before a second degree burn occurs. An SFI rating of 3.2/1 is 3 seconds, and a rating of 3.2/20 is 40 seconds.

Below is the items that I have picked out to purchase towards the completion of the race car build.


There are several other things to consider as far as safety is concerned. In general I need to take the time to make sure that the fabrication is done well. There is a balance to consider between building things light enough to race and heavy enough to withstand impact.

I will be building tubular frames around the fuel cell, mounting both front and rear bumpers, and hanging all new sheet metal on the car. I am going to install hood and trunk hold-down pins. I also have to rebuild the seat and steering wheel mounts.

I will most likely be making separate posts on some of the safety features once I get started on them. Until then, I need to do more shopping....take care for now. 

Thursday, November 2, 2017

Punky Manor - Vintage Stock Car - Tribute Build

Tools - always one more!


One thing I did not really think much about when I decided to build a vintage race car is the additional tools that would be needed. I already own a pretty extensive collection of hand tools, but there always seems to be additional tools that are needed when taking on a project like this.

First off, I do not work on engines or heavy pieces of equipment very often. In the past, I would usually just borrow an engine hoist when I needed one. When the time came to retrieve the 460 cubic inch "boat" motor I had purchased, I finally decided it was time to get an engine hoist.

I ended up buying a 2 ton foldable shop crane. Since I will need to move the engine several times during the build of the race car, it made the most sense to just buy one. I also picked up a heavy duty floor jack for getting the race car up off the ground.


There was also the need to put the engine somewhere to work on once I got it hauled home. Fortunately I built myself a heavy duty engine stand way back in the day. It had been sitting around for quite a while, so i needed to freshen it up a bit. I cleaned it up and put a new coat of paint on, and it was ready to go.


When I started to look at how to do the wiring for the race car, I realized I didn't have any decent tools for the task. I decided to build a fuse block so I purchased a decent soldering gun, a butane micro torch, a decent wire stripper, as well as wire terminal and shrink tube kits. 


A big part of this project is the replacement of the old body panels.The original sheet metal on the Torino has seen some action on the track and it shows. There are crudely applied patch panels. The entire passenger side of the race car is covered with large patches of body filler. 

Instead of trying to repair the roughed up panels, I decided to search and find as many replacement body parts as I could. Most of the body will end up be replaced.

In order to speed up the replacement process, I am prepping all the parts before I haul the car off to the rebuild location. This involves cutting off as much of the inner (dead weight) sheet metal as I can. I will do a separate post describing that process in detail later on.

I have prepped several of the panels already and have a few left to finish up to primer. During the process I did have to buy several new air tools and a ton of sanding and grinding supplies.

Then there are special tools that are very nice to have. In order to hang sheet metal a Cleco temporary fastener tool is very helpful. 

I also picked up an engine lift plate that bolts to the intake of the engine when you need to lift it with an engine hoist.

Another tool that is nice to have for prepping the new body panels is a body hammer and dolly set.

I have quite a few rivets to install during the build so I decided that a pneumatic air rivet tool would be nice as well.

And finally, in order to clean up all the old bolts and threaded fasteners, I ordered a thread restorer tap and die set.


Next time I will cover some of the safety equipment that I will be purchasing along the way. There are certain parts and equipment that are required based on the Vintage Racing Club rules, and other safety gear needed to be safe out on the track. Take care for now. 


Wednesday, October 25, 2017

Punky Manor - Vintage Stock Car - Tribute Build

Parts Hunting - Part 4


As I mentioned in my last blog, I am trying to put together as many parts as I can to make the rebuild process as quick and as trouble free as possible. 

I have already purchased quite a few of the parts I will need to rebuild the Punky Manor - Torino GTS Tribute car, but there always seems to be new things added to the list that need to be tracked down and purchased. I am chipping away at the list of goodies as rapidly as the current budget allows.

I have already found and bought most of the body panels that will be replacing the old race car body. Most recently I was able to find a lower front valance panel (which are hard to find in good shape), and a "new" deck lid or truck panel. As I was paying for the deck lid, I was asked if I had motor mounts for the engine. Shortly afterwards I was handed a full set of motor mounts by Joe down at Joe's Auto Sales in Hastings, MN.

I decided to go ahead and make a spread sheet of the main parts I still need for the major rebuild session I am planning in the near future. A couple of things are a bit more costly, so they are on the waiting list. One of those items is the fuel cell. I checked out the one that came in the Torino but it is in rough shape, so I will be getting a new 16 Gallon fuel cell from Summit Racing.


In order to hang the entire new set of body panels and establish the new wheel openings, I will need to buy wheels and have them mounted inside the set of vintage McCreary racing tires. Finding wheels that match the style that Punky used during the 1974 season has been challenging. If you look at the photo below, you will see that the wheels are steel slot style that were painted instead of chrome plated. 

  
I managed to find a brand of powder coated steel wheels that are a bit different than the steel slots, but they are closer in appearance than modern dirt track wheels. I have so far ordered a pair of Cragar (V-5) 15" X 10" and will need to test fit and paint silver over the black.


Another major element for getting the body panels properly located is having the car weighted as close to the finished weight as possible. This means that the engine and major components need to be installed as well. I now have the correct motor mounts, so I will be bolting the engine, bellhousing, and transmission together and setting them in place. I also need to make sure the hood will clear the air cleaner so I picked up a reproduction mid 60's style Ford Mustang air cleaner. Other air cleaners might be cheaper and easier to find but I wanted something that looks period correct.


I have also started working on how to finish or detail some of the new body components that will be going into the rebuild. The current front grille area of the race car is a mess. Headlight buckets are broken or missing. Little attention was given to signal light openings, etc. I am planning on filling the headlight openings with aluminum covers. I have already cut and drilled all the aluminum panels that will cover up holes in the various body panels. The headlight area presents a design problem that can only be sorted out once the front end has been properly put in place. Below is a steel frame I fabricated that will provide a mounting surface for the aluminum headlight covers.

Both of the original front and rear bumpers were in rough shape and needed to be replaced. I have already built a tubular mounting support for the rear bumper. The tubular structure will be welded to the frame and roll cage and is built in such a way that the bumper itself will be removable if repairs are needed in the future.


The "new" front bumper has been cleaned up and aluminum signal opening covers have been cut and drilled and are ready for installation. 


Then there is a bunch of smaller parts to be considered. The 460 engine that I purchased had been sitting for quite a while and rust and grime was present on most of the parts. I have started taking inventory of all the hardware that will be used on the engine and car. 

Each bolt, nut, and fastener will need to be checked and cleaned or replaced. I have started prepping all the bolts for the engine so it can be bolted together enough to test for location and fit. 


In my next Blog Post, I think I will talk a little bit about something I hadn't given much thought at the beginning of the project....Tools! Now that the assembly phase is getting closer, I have started to think more about what all will be needed to make that happen. Take care until next time! 

Monday, September 18, 2017

Punky Manor - Vintage Stock Car - Tribute Build

Parts Hunting - Part 3


Upon first inspection of the Torino GTS vintage race car, I noticed that it had the basic electrical components of a dirt track stock car. There was a main power shut-off knob, a tachometer, and a couple of gauges. These were all hooked to a small birds nest of wires that tangled into the engine bay and back to the battery tray just behind the drivers seat.

Here is a picture of my first glance into the interior of the car...


And here is the cluster of wires and components that I pulled out of the car...


Beyond the fact that it is all a mess, none of it looks like it is from the correct era. Punky raced his Late Model Dirt Track Torino in the 1974 racing season. I need to install a "new" set of components that look like they belong in a vintage stock car. 

I also intend to use the Torino Tribute car for other purposes than just racing. I might end up going to car shows and perhaps a parade, so I need to design the electrical system to perform beyond that of a simple race car. 

Generally a dirt track car is equipped with a battery for power and the alternator or charging system is eliminated to save on weight. I intend to run an alternator, so I am designing my electrical system to include that component.

First off, I started to collect all the separate components that I will be installing in the car. During the process I was careful to try and find parts that looked like they were from the correct era. 

Tachometer...


Gauges...


Switches...


Here is a collection of the parts I have purchased so far....


I decided that it would be a good idea to build a fuse block panel in order to safely run power to the assorted components I will be using. I don't know the first thing about building one of these, so I had to rely on some research and YouTube videos for help.

I ended up finding a video that showed how to build a 4 relay fused circuit board on an ABS plastic panel. I bought an assorted terminal kit, soldering iron, mini torch and shrink tube kit. I then sat down and started to put it all together.


The finished fuse block doesn't really look period correct, so I will most likely install it with a cover. I was mostly concerned with having a clean, dependable and safe electrical system in the car. 

I can now look into the various electrical components I will be connecting to the fuse block. I will most likely be running an electric fuel pump, a few safety lights, and whatever else I end up needing in the car. I can do all this by running the higher amps through the relays and fuses. In addition, the rules require that I include a main power shut-off switch, and an oil pressure switch hooked to the electric fuel pump.  

I now need to start designing the rest of the electrical system and figuring out where it will be located in the race car. The Battery Box is something else I will be fabricating. I found a couple of samples for reference and will be fabricating a test piece. Most likely, it will be welded up and installed as far back in the car as possible.


The next goal for the Punky Manor Tribute Torino GTS is to purchase the last few parts I need in order to start the actual rebuild. I need to pick up a new fuel cell, wheels, steel tubing and a sheet of expanded steel. Then I will hopefully have enough parts to make a big push on rebuilding the Torino into a presentable race car!

Sunday, July 30, 2017

Punky Manor - Vintage Stock Car - Tribute Build

Parts Hunting - Part 2 


I last posted back in April but a couple of things have caused a bit of a slow-down for me on this project. One is that we moved to a new place, the other is Summer rolled in! But that hasn't stopped the planning and parts hunting. 

Back in February I managed to locate an engine on Craigslist that I think will work out well for the Tribute Car. A gentlemen up near Dassel, MN had an older Ford 460 cubic inch that came out of a V-Drive Boat. It was a 320 horsepower 460 that was still equipped with all the marine accessories. 

Here are a few pics of us getting the engine picked up and delivered to it's future home.


Next up, I located a 3-speed "Toploader" manual transmission, again out on Craigslist. Bob "the Turkey farmer up near Aitkin, MN said he had this transmission in his shop and he wasn't sure what it was from but wanted it gone. So I drove up north and brought it back home as well. While I was there I was able to see 15,000 of Bob's 30,000 turkeys and hear some great stories!


Can't install a transmission without having a bellhousing. I reached out to French Lake Auto Parts in Annandale, MN and asked if they had a 460 manual transmission bellhousing and yes, they said they did have one. So I brought it home, cleaned it up and sprayed the exterior with metal-etch primer.


The most interesting find so far has to be the shifter set-up. I was talking to a co-worker about the collection of older parts that were passed down from his Father. I asked if he thought he had any 3-Speed shifters, and yes he said, I believe I do. So he brought in a pretty rare piece of equipment. 

There was a chain of stores in this area called 10,000 Auto Parts. Back in the day they would take products out of the box and sort and set all the parts and pieces of the kit on a bright yellow (in this case) piece of cardboard. They would then vacuum seal them to the cardboard and add grommets on top to hang up for a store display. 

My co-worker just happened to have a vintage Spark-O-matic 3-Speed shifter display that he was willing to sell for the Tribute Car. It's like a time capsule dated on the back Feb.1st 1977. Perfect vintage for the Tribute Car.


My most recent acquisitions were a "new" set of gauges for the dash of the race car. Most of the gauges that are for sale currently do not look like they are from the 1970's. The car I am trying to reproduce was raced during the 1974 season and new gauges would look out of place.

I was able to track down a set of smaller 2" gauges and a 3 3/8" tachometer that have more of a vintage feel.


I still have several other parts and pieces that need to be located. The ultimate plan is to acquire enough of the needed parts to make a big week-long push to get the race car re-built, body replaced and the first color painted. Take care until next time!