Wednesday, December 26, 2012

Roger Reiman - Reference Images

Mural Design - Reference Materials


In our initial introduction to the Roger Reiman-Kewanee Walldog Mural Project, we were given only Roger's name and a few reference images. Below is the collection of images provided to us at that time.


Additional Reference Images


Our research produced several more images that we are able to draw inspiration from to begin the mural design process.

Dianne and Dennis Packee, who now own Reiman Harley-Davidson, have been a great resource for us. They were willing to share with us quite a few images in their collection. 

We also made contact with the American Motorcycle Association and they were generous enough to send us several high quality images from Roger's illustrious racing career.

Our final image source was Harley-Davidson. As I have already mentioned, I am co-leading this project with Ted Turner, a designer at Harley-Davidson. SInce Roger Reiman rode for the Harley-Davidson racing team, and set speed records in their machines, they had several images in the Archives that Ted was able to acquire for our project.

Below is a composite image of most of the images we were able to collect from the sources mentioned above.


Now that we have an extensive collection of images to pull inspiration from, and a host of magazine and newspaper articles to fill in the details, it is time to start the ideation phase.

Ideation is the process of forming new ideas. In this case we will be trying to create a large-scale visual image that depicts the life of Roger Reiman using the reference materials we have assembled through the research phase.

Next up we start the mural design process.


Wednesday, December 5, 2012

Roger Reiman - Research

Walldog Mural - Connections


Starting on this post makes me think of the old saying, "a picture is worth a thousand words".  At each Walldog event we are given the task of producing a visual representation that will adequately depict  the mural theme assigned to us. Some mural designs are fairly straight forward and do not require much research. On the other hand, there are those subjects that we feel compelled to research completely and that we connect with on a very deep level.

In my last post, I mentioned that I was very intrigued when I first heard about the Roger Reiman Mural project. I found it interesting that Roger had competed on the old Daytona beach course and also that he won the first Daytona 200 race held at the Daytona International Speedway in 1961, the year I was born. Daytona has a long, colorful and sometimes tragic history going back to 1959. In June of 2003, I travelled to Daytona to attend the Dale Earnhardt Tribute Concert. I stood on the tri-oval and looked around the track that took the lives of both Dale Earnhardt (2001) and Roger Reiman (1997).

There was yet another connection that I felt when I heard about this project. My cousin, Punky (Neil Jr.) Manor was one of the top Dirt Track racers in the Upper Midwest back in the late 70's.  His life was cut short in a tragic highway accident in November of 1979. Because of this, I think I could relate on a deep personal level to the friends and family members who lost Roger.

Somehow I knew deep inside, that my design for the Roger Reiman Mural was going to have to be worth a lot more than a "thousand words".  Initially I was given only a few minor details abouts Rogers life, but I needed to find out a lot more.

Early Design Research 


Initially our research started out in the usual way. We started out searching on the web for any and all images and website information we could find. We came across the AMA (American Motorcycle Association) website and found the Motorcycle Hall of Fame page dedicated to Roger Reiman. That page gives a fairly good summary of Roger's racing career. Somewhere along the line, we came across a couple of phone numbers to try, well maybe more than a few!

My wife spent a few days making phone calls and had some pretty good success. She discovered that Roger's good friend Dennis Packee and his wife Dianne were the current owners of Reiman's Harley-Davidson Dealership in Kewanee. IL. Not only that, Dianne was one of the organizers for the upcoming Kewanee Walldog event. We also discovered that there was a Museum for Roger inside the Dealership, so we set up a visit with them as quickly as we could!

My wife also reached out to Roger's Sister and contacted the AMA to see if they had any photos that we could use for reference. The organizers of the event also mentioned George Sedlak and told us that he was interested in possibly helping to paint on the mural. Upon further research, George was the artist that painted helmets and bikes for Evel Knievel back at the same time Roger was building bikes for Evel.

I also looked for anything I could find out on eBay that had to do with Roger, the Daytona 200, Evel Knievel, etc. I found and purchased every magazine and photograph I could find. For my next post, I hope to consolidate all the information we have gathered to date, in order to move a bit closer to the ideation phase.

Below is just one of the images we discovered in our search. Next time I will share more, a lot more.


Sunday, November 25, 2012

Roger Reiman - Invitation

Walldog Project Introduction


The 2013 Walldog event is to be held in Kewanee, IL. I first heard about the event on our sister site, Letterville.com in mid April of 2011. Initially it was announced that the event would be held in conjunction with the "Hog Days" celebration over the Labor Day weekend in 2013.

In August of 2011, it was confirmed that the event would be held from July 10th - 14th of July 2013. I believe it was around the same time that I was asked if I would like to lead a project at the Kewanee meet.

Some events that I have attended have been planned as little as 8 months or so before the event date. Others, like Kewanee, are being planned 2 years before the event. Both can be successful, it just takes the proper type of planning, not necessarily the amount of planning!


Project Selection


The Walldog representative (Scott Lindley A.K.A. "Cornbread" for the Kewanee event) works with the community organizers to match the Project Leaders with the mural subject matter. These decisions are sometimes based on past experience as well as each artists interests, and sometimes it seems to be based on sheer guess work? But they always seem to be well matched and end up executed incredibly well.

Over the years, I have been asked to design and paint murals for some very interesting subject matter. I did a two part post on this previously and you can read more here...

Mural Themes

As I discussed in the previous posts, sometimes it seems like a roll of dice that you somehow end up with the mural subject matter that best matches your experience and interests. It seems that the Kewanee project will continue that tradition for me.

Back in early May I attended a small Letterhead Meet in Pontiac, IL where I was given the opportunity to review the mural subjects with Cornbread. I was told that Kewanee, IL was once named the "Hog Capital of the World" because of leading the nation in hog production.  Cornbread then described several of the chosen mural subjects, local businesses of note, as well as the things like famous Wing Walkers and a "colorful" local architect. Then he touched on a subject the piqued my interest....a championship winning motorcycle racer. 

Cornbread mentioned the name Roger Reiman and that he had won the first motorcycle race held at the then brand new Daytona International Speedway. He also mentioned that Roger had been a mechanic for Evel Knievel and had been a rider for Harley-Davidson. Finally Cornbread told me about the unfortunate accident that took Roger's life at Daytona Speedway during a practice session for a 1997 Legends Series race. 

Normally (if there is such a thing in the Walldogs group), the project Leader is sent a packet of information several months before the event. There might be photos, and reference articles describing the subject matter in various amounts of detail. It is up to each mural designer, to either work with the information they were sent or to do additional research. In the past, I have had a good amount of information sent over and could work from what I had received. There were also other times, where there might not have been much material available and I had to create the entire mural design concept.

In this case, Cornbread had given us enough information to get started with. From here, my wife and I could proceed with our own more in depth research. As well as the brief description Cornbread had given us, there was also a half dozen images in a folder, so I copied those over to my laptop. Below are the reference photos we had to work with....So far!


My next post will describe the research that we have done and the additional reference material we have discovered in our search up to that time.  


Tuesday, November 20, 2012

Roger Reiman Mural - Introduction

Mural Painting - The Way of the Walldog Meet 


I would like to take you through the entire process for designing and painting a large-scale exterior mural project as it applies to a "Walldog" event. This will require a series of posts, starting with the initial mural project concept selection process, up through the completion of the painted mural.

I have mentioned the Walldog group in previous posts, but will post the link again. If you are interested in more information, you can click on the link below and look around the site. If you are interested in participating in one of these "meets", there is information on future events.

The Walldogs

Over the last 20 years, we have been working with various cities or towns around North America to hold a large Walldog event where 6 to 16 murals are painted over a 4 day period. In 2012 the event was held in Arcola, IL. In 2013 we will be celebrating 20 years of Walldog events with the community of Kewanee, IL.

Subject Matter


One of the first things a community does in the initial stages of planning for a Walldog event is to pick the subject matter for the murals. Usually the subject matter chosen is related to the town's history, town founders, celebrities, historical business, etc. 

The Walldog representative who is organizing the event works closely with local event organizers to pick subject matter that most people in the community can relate to and enjoy seeing displayed on the walls of their town. For obvious reasons, we try to stay away from subject matter that might be considered advertising for present day businesses. The Walldogs want to create works of arts that the community can all celebrate and enjoy over the years.

Project Leaders


The Walldog representative hosting the event, is usually the person responsible for choosing the Walldog Artists that will lead each mural project. He or she does their best at matching each Project Leader with a subject matter that the Artist can fully enjoy and perform well on. Some project leaders have many years of experience, and some will be leading their first ever mural project.

Mural Site Selection


The community members who are sponsoring the Walldog event once again work closely with the Walldog representative to choose the best sites for each mural project. Permits and permissions have to be obtained and signed off on before wall prep can begin. Once the mural sites are selected, they have to be prepared to be painted on. Occasionally, the walls may need to be repaired or updated before they are primed and ready to paint. If the selected site walls are not smooth enough for paint, Aluminum Composite Material (ACM) panels are built and attached to the wall or an easel before painting. These panels are attached to an aluminum framework and also need appropriate preparation for the type of topcoat being applied.


Ok, there you have a rather generic outline for the initial steps for a Walldog Mural Project. My next post will describe how I was selected to lead a project for the 2013 "A Hog in Dog Heaven" Walldog event in Kewanee, IL


Saturday, November 3, 2012

Problem=Solution


When I was growing up, my family didn't have a lot of money, so we had to come up with creative and inexpensive solutions. When my dad wanted to build something, he would think about it for a while. Then he would find some paper and a pencil and sketch up a dimensioned drawing of the project.

I saw him do this with something as simple as a birdhouse all the way up to a built-in corner cabinet for our house. With this type of sketch, he could also figure out exactly what materials would be needed for the project build. Using this process, he could think about how to find and or buy the required building materials.

I'm not sure how this influenced my own choices over time, but I do know that I have applied this same process to my ever-evolving design thinking. When I set out to do a new project, I start by drawing a dimensional sketch. Then I look at the most cost effective way to produce what I am planning to build. Once all that is done, I can look at the build versus buy options.

Although I know how to draw up my plans using a pencil and paper, there are much more advanced tools available today. Let me explain the more modern approach to creative problem solving, as it applies to a simple shed project.

Problem= I have too much stuff

Solution= Get rid of stuff
               Increase storage capacity

As I have mentioned in previous posts, I am trying to set up a studio workspace in my basement. My wife and I both paint and we also have a lot of supplies and equipment that we use for mural painting.

We want to clear out some of less used equipment and only have so much space in our garage. So, we looked into putting an 8 x 12 storage shed in our back yard. We went out and looked at the various kits available at the big home improvement stores.

An 8 x 12 storage shed kit with floor costs around $1200. From my research, many of these complete kits come bundled with material that many times are warped or twisted and need to be replaced, thereby increasing cost. All of these kits are made to stay together once built, so if you ever move you have to try and move a large shed or leave it behind and start over at your new place?

So, I decided to do a cost comparison between what the home improvement stores offer and what I could build myself. Just to make it interesting, I thought I would design my shed so that it could be made of bolted together sections that could be disassembled and easily moved on a small trailer. Another advantage of building your own, is the option of picking out the best materials that are available at the building store.

First upDraw the shed.

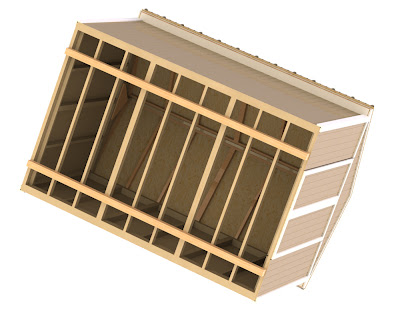
I now use a computer program called SolidWorks to draw my projects. Solidworks is a high-end 3D solid modeler program that allows me do design full-scale and assign materials to each part. There is an integrated program called PhotoView 360, which allows me to render a realistic image of the finished design.

This program basically works in reverse of the traditional mechanical design process. Instead of doing a scaled orthographic projection (front, side and top views), and then trying to figure out the 3 dimensional structure. I design the 3D part or assembly in SolidWorks and then create drawings from the various part files (if necessary). 

I drew up each part of the shed, full-size and fully dimensioned. Then I added the appropriate materials and appearances to each components. Below are renderings of the shed assembly that were generated using PhotoView 360.


Using this software to design my project allows me to rotate to any angle or view, zoom in, hide or make parts transparent. I can then make the typical orthographic projection drawings from the 3D parts because they are already fully dimensioned. Creating a drawing is all drag and drop once the assembly file is built and saved.


I then created an Excel spreadsheet to determine what the overall cost of this project would be. I haven't added in the cost of the metal roof or hardware yet, but you can get the general idea. I can pick out my own materials (which will be straight) and build this shed for at least $500.00 less than buying a take-what-you-get kit. 


Thanks to my Dad for giving me these problem solving skills. They have been quite valuable over the years. Not to mention, I learn a lot on each of these explorations.


Monday, October 15, 2012

Arcola "Pop the Top" Walldog Event

Each summer a group of creative artists gather to paint several murals in one or two towns in America. The group is called the Walldogs and it is made up of creative artist from around the globe who get together to promote hand painted exterior wall murals. Click link below to learn more...

thewalldogs.com

I wanted to share some photos of the murals we painted at this year's Walldog event in Arcola, IL.

15 murals painted in just 4 days......June 20th - 24th, 2012


Tuesday, June 19, 2012

Pop the Top Walldog Event, Arcola, IL June 20 - 24, 2012

Well, we are packing up to head down to this Summer's mural event being held in Arcola, Illinois. We will be joining together with approximately 140 of our fellow artists, to paint up another Midwestern town.


 This year there are artists coming from New Zealand, Australia, Scotland, and several from Canada. Arcola has lined up 15 large-scale exterior murals for us to paint during this 4 day event. 

 At this year's event, my wife and I will not be leading a project. instead we will be helping our friends wherever we are needed the most. At last year's event, my wife and I were busy planning our wedding, so we were not able to help paint as much as we like. But this year, we can help as much as possible.

Earlier this year I decided to build a new stereo system for Walldog events. As long as I can remember, I've always loved to listen to music while I work. This of course has carried over to mural painting. So this year I finally pulled out all the stops and decided to build the system I've been thinking about for years. 

If you're not familiar with mural painting or Walldog events, I will explain one of the first steps of the process to try and make more sense of my sound system idea. 

The first night of a Walldog event, is generally set aside to project the art on the wall. We use overhead projectors with the art printed on clear transparencies. Recently, the city hosting the event turns off the street lights in order to make the projected images easier to see. We project and draw the images on to pre-primed white walls. 

 Not sure about you, but when I see a big white wall, my minds starts to tell me to put something on it.

After the projection process, we usually hang around and catch up with old and new friends. I always thought it would be fun to build a surround sound system with an on-board digital projector. I was finally able to find the components to make this idea a reality. So, I spent the last couple of months designing and building my (somewhat portable) audio/video Walldog system. Here is a couple pics of the unit...


 This contraption of mine includes the following features...

 1000 watt Panansonic Surround Sound Home Theater System (5 speakers, sub, amp)

 The system plays DVD's upscaled to near HD, and includes an FM tuner.

An iPod dock built in with controls that show up either on the 7" LCD screen or on the projected image.

Can be hooked up to an iPad to play audio, video, slideshows, YouTube, and Netflix (when WiFi is available).

 Includes a ViewSonic DLP digital projector mounted on a 4-way swivel base so we can project out the front, sides, or back. The projector unit is also mounted on slides so it can be removed and positioned on top of the system.

3-way video control switch to feed the different video sources.

A digital clock built in with dual temp displays....which includes a remote temp sensor for secondary temp readings. I can hang the remote sensor on (or locate it near our wall) to determine how hot the painting surface is.

Ground effects LED lighting and an LED "night light", both with on and off switches.

There is also a 12 volt cigarette lighter jack for cell phone and USB charging when needed?

 All of this enclosed in a perforated steel structure with 4 Monopod legs and four tripod extension speaker mounts.


So, I will be trying to update the blog from Arcola's event with pictures. This all depends on the access to WiFi in the area. And how late I work into the night.

 Till then....

Monday, April 9, 2012

CNC Router Setup

I have had a few requests regarding a CNC router setup technique and thought I would detail it here on my blog. This is setup I have used for a wide variety of softer materials and I would not recommend the following setup for any type of metal.

That being said, perhaps I should preface this description with a bit of my background. In the late 90's I was employed at a prototype shop in Northern Wisconsin. Our clients included, Compaq, 3M, U.S. Army, Fiskars, NCR, among many others.

In that particular shop, we used 3 & 4 axis VNC's (vertical machining center), and a 5 axis router table type machine. I used this technique at that shop daily for 3 years to cut hundreds of parts.

Below is an example of the machines we used. Milltronics VNC for 3 and 4 axis work, and a Motion Master 5 axis CNC router table.


And here is a few samples of the work we were doing.


Milling a Compaq laptop base for a presentation prototype out of RenShape modeling board.


Urethane clear casted complete laptop, used for smoke-flow fan performance testing.


Infrared firefighter camera.


Another infrared camera application.


And a few non-functional tape measure prototypes.

Now on to the pin location cut method Procedure.

In order to use the location pin method of cutting, you need to adhere a waste board to the router table. You can use either a sheet of ABS plastic or MDF. Which ever you choose, it just has to be dense and thick enough to support the pins you will be using to locate your part. There are a couple of things to point out about this step of the process.

1. The waste board has to be flat and parallel with the router table.
2. It needs to be secured to the table so it will not move during the process. (we did not use a vacuum table)
3. It needs to be larger than the block your part is being cut from.

You should tape down the waste board and fly-cut both sides to ensure the top surface is parallel with the router table.

There are few benefits to using ABS for your waste board. It is more stable than MDF. You can patch your drill holes by super-glueing ABS rods (the same size as your location pins) then fly-cut it smooth again. It holds your location pins in place much more securely than MDF.

If you are using MDF for a waste board, it is necessary that you spray paint the surface you are applying the tape to, which will ensure a good bond with the tape. This is also highly recommended with any porous and powdery substrate you are trying to tape down.


Above is a diagram of the process of setting up to cut your part block.

The best tape I have found for taping your waste board and part stock to the table is (Nitto) Permacel 2" wide double sided craft tape. It is .007 thick and can be "loosened" after use with some denatured alcohol if you need help in getting your stock loose. you can find the tape here if you need to order some: http://www.findtape.com

So if you look at the diagram above for reference, I will try and walk through the steps for cutting a one-flip part. (click on the image to enlarge it)

1. Attach and fly-cut the waste board to table with the Permacel tape.
2. Cut stock to a size that allows a bit of extra room for location pins on each end.
3. Locate part stock on table and make it's thickness parallel, using the same fly-cut method you did for the waste board.
(Remember to spray the substrate with gloss spray paint and let it dry completely before trying to apply tape to it. This is absolutely necessary with a substrate like urethane foam modeling boards.)
4. When setting up you tooling path , your first tool should be a drill (tool path) that drills down through the part block and into the waste board but not into the router table!
5. Install location pins in the location pin holes (threaded pull-out dowel pins are available at mcmaster.com) slide permacel taped substrate in place over location pins.
6. Run all tool paths on first side. It might be necessary to set your depth of cut on the first side so there is a web of material to help support the part when flipped over to cut the second side.
7. Pull the pins out of the block and carefully pry your part off the table. (mcmaster also sells pin pulling devices like in the pictures below, to aid in pin removal.) Once again, you can wick some denatured alcohol under the part, to help loosen up the tape. Just make sure it is wiped completely dry before you stick the second side down.
8. Flip the part over in the same orientation (axis) that you used when setting up the tool paths.
9. Apply Pemacel tape to second side and slide part block over location pins.
10. Run all the second side tool paths. (here again it may be necessary to leave a bit of webbing around the base of the cut to secure your part in the block. A final outline cut of the part will free it from the block.
11. Pull pins and pry left-over stock off the waste board.


So there you go...quite simple really. You are probably asking, what could I possibly ever cut out with this method. What if you wanted to add a 3 dimensional spoon to a restaurant sign? Set up the file, then use the steps above to cut most any non-symmetrical part you need to cut.

If you have any questions just post them in the comments section below, and I'll try and help you out.....thanks

Sunday, March 25, 2012

Charity Auction Events

In my last post, I started painting a Harley Davidson mural in my basement studio. Once again, I have wandered away to perform other tasks and haven't updated my blog page for a while. This time I think I have a good reason. I will get back to the completion of the Harley mural after I take this short break to describe the charity events that I am involved with.

In the dead of winter, when most people are waiting to watch the Super Bowl, I begin to think about panels I can paint and donate to the World of Wheels Charity Auction events. For the past 10 years the Pinstripe Legends group has gathered at the Milwaukee World of Wheels car show. All the money that is raised from several auctions during the weekend event is donated to the Children's Hospital of Wisconsin.

There is another group called the Chicago Brushmasters that has been gathering to do a similar event at the Chicago World of Wheels show. The Brushmasters have been active since 2008 and donate 100% of their proceeds to the worlds largest Ronald McDonald in Chicago.

Back in 2008 I relocated back to the Milwaukee area and learned about the Pinstripe Legends Charity event from a friend. Even though I am not really a Pinstriper, I decided to attend my first charity auction event in 2009. This year marks my fourth year of helping out at the Milwaukee event. Here is some of my donations from the events...

First few panels here were sold at the Pinstripe Legends event in Milwaukee, WI....


The last two panels shown here were donated at the 2012 Chicago Brushmaster's Charity Auction Event....which raised around $63,000 for the Ronald McDonald House.


So far it's been a fairly productive year. Next up, I am putting the finishing touches on a new web page, more on that in a bit.

Take care for now.

Sunday, January 1, 2012

Harley Logo - Sepia Tone

It seems that life tends to sweep me away from posting for a couple months at a time. Between writing a book for my new Grandson, full-time work, finishing a sign and getting through the holidays, it not too hard to see where the time has gone?

I did get a good start on my sepia tone basement wall mural and wanted to share the progress. (Here is a link to the wall prep for this project).

In some ways, the sepia tone technique is new to me so I will describe the process as I go along. In my last post, I included a couple of images of the old Harley Davidson art that I was hoping to paint on the wall. I really like the sepia tone look of the board racer image and decided to paint the old Harley logo in the same colors.

The very first step in this process is to purchase the paint that will be needed to complete the mural. A short while before we started this project, my wife and I stumbled upon some new paint to try. Rust-Oleum produces a water-based metallic line that comes in 2 oz. trial size containers. We ended up buying four colors that we thought would best match the sepia tone pallet we had in mind for the board racer mural. These colors have a pearl like appearance so we were not sure how well they were going to match the Nova Color acrylics, but it's worth a try?

Next step was to project the image on the wall as large as we could make it. I used an overhead projector with our art, inkjet printed on clear transparency film.


I used a #2 pencil to sketch the logo on the wall. Because there is always some distortion caused by the projector, I had to go back in with a level to correct some lines. This is especially apparent when there is vertical lines on the wall to compare the layout to.


Next up, I started to apply some of the Metallic Accent colors on the wall following the pencil layout lines. The champagne color below is not wet, but it is metallic so it reflects light at certain angles.


The Rust-Oleum Metallic Accent colors tended to go on a bit light and usually required two coats. Even with two coats, some "pooling" of paint still occurred. I believe that this was the result of applying water-based paint over the WaterTite oil-based water proofing wall paint. This "pooling" effect actually made the Rich Brown accent color take on a worn leather or suede look. Even with the unexpected color results, the Accent paints look like they bonded well with the base coat.

Here is the logo with a couple of the colors completed. I don't recall ever seeing the Harley logo done in sepia tone, so I made up my own color pallet.


Here is the finished logo...


My next post will show the layout and painting of the board racer portion of the mural. I'm looking forward to exploring further, the process of sepia tone painting with Nova Color Artist Acrylics.