Sunday, November 25, 2012

Roger Reiman - Invitation

Walldog Project Introduction


The 2013 Walldog event is to be held in Kewanee, IL. I first heard about the event on our sister site, Letterville.com in mid April of 2011. Initially it was announced that the event would be held in conjunction with the "Hog Days" celebration over the Labor Day weekend in 2013.

In August of 2011, it was confirmed that the event would be held from July 10th - 14th of July 2013. I believe it was around the same time that I was asked if I would like to lead a project at the Kewanee meet.

Some events that I have attended have been planned as little as 8 months or so before the event date. Others, like Kewanee, are being planned 2 years before the event. Both can be successful, it just takes the proper type of planning, not necessarily the amount of planning!


Project Selection


The Walldog representative (Scott Lindley A.K.A. "Cornbread" for the Kewanee event) works with the community organizers to match the Project Leaders with the mural subject matter. These decisions are sometimes based on past experience as well as each artists interests, and sometimes it seems to be based on sheer guess work? But they always seem to be well matched and end up executed incredibly well.

Over the years, I have been asked to design and paint murals for some very interesting subject matter. I did a two part post on this previously and you can read more here...

Mural Themes

As I discussed in the previous posts, sometimes it seems like a roll of dice that you somehow end up with the mural subject matter that best matches your experience and interests. It seems that the Kewanee project will continue that tradition for me.

Back in early May I attended a small Letterhead Meet in Pontiac, IL where I was given the opportunity to review the mural subjects with Cornbread. I was told that Kewanee, IL was once named the "Hog Capital of the World" because of leading the nation in hog production.  Cornbread then described several of the chosen mural subjects, local businesses of note, as well as the things like famous Wing Walkers and a "colorful" local architect. Then he touched on a subject the piqued my interest....a championship winning motorcycle racer. 

Cornbread mentioned the name Roger Reiman and that he had won the first motorcycle race held at the then brand new Daytona International Speedway. He also mentioned that Roger had been a mechanic for Evel Knievel and had been a rider for Harley-Davidson. Finally Cornbread told me about the unfortunate accident that took Roger's life at Daytona Speedway during a practice session for a 1997 Legends Series race. 

Normally (if there is such a thing in the Walldogs group), the project Leader is sent a packet of information several months before the event. There might be photos, and reference articles describing the subject matter in various amounts of detail. It is up to each mural designer, to either work with the information they were sent or to do additional research. In the past, I have had a good amount of information sent over and could work from what I had received. There were also other times, where there might not have been much material available and I had to create the entire mural design concept.

In this case, Cornbread had given us enough information to get started with. From here, my wife and I could proceed with our own more in depth research. As well as the brief description Cornbread had given us, there was also a half dozen images in a folder, so I copied those over to my laptop. Below are the reference photos we had to work with....So far!


My next post will describe the research that we have done and the additional reference material we have discovered in our search up to that time.  


Tuesday, November 20, 2012

Roger Reiman Mural - Introduction

Mural Painting - The Way of the Walldog Meet 


I would like to take you through the entire process for designing and painting a large-scale exterior mural project as it applies to a "Walldog" event. This will require a series of posts, starting with the initial mural project concept selection process, up through the completion of the painted mural.

I have mentioned the Walldog group in previous posts, but will post the link again. If you are interested in more information, you can click on the link below and look around the site. If you are interested in participating in one of these "meets", there is information on future events.

The Walldogs

Over the last 20 years, we have been working with various cities or towns around North America to hold a large Walldog event where 6 to 16 murals are painted over a 4 day period. In 2012 the event was held in Arcola, IL. In 2013 we will be celebrating 20 years of Walldog events with the community of Kewanee, IL.

Subject Matter


One of the first things a community does in the initial stages of planning for a Walldog event is to pick the subject matter for the murals. Usually the subject matter chosen is related to the town's history, town founders, celebrities, historical business, etc. 

The Walldog representative who is organizing the event works closely with local event organizers to pick subject matter that most people in the community can relate to and enjoy seeing displayed on the walls of their town. For obvious reasons, we try to stay away from subject matter that might be considered advertising for present day businesses. The Walldogs want to create works of arts that the community can all celebrate and enjoy over the years.

Project Leaders


The Walldog representative hosting the event, is usually the person responsible for choosing the Walldog Artists that will lead each mural project. He or she does their best at matching each Project Leader with a subject matter that the Artist can fully enjoy and perform well on. Some project leaders have many years of experience, and some will be leading their first ever mural project.

Mural Site Selection


The community members who are sponsoring the Walldog event once again work closely with the Walldog representative to choose the best sites for each mural project. Permits and permissions have to be obtained and signed off on before wall prep can begin. Once the mural sites are selected, they have to be prepared to be painted on. Occasionally, the walls may need to be repaired or updated before they are primed and ready to paint. If the selected site walls are not smooth enough for paint, Aluminum Composite Material (ACM) panels are built and attached to the wall or an easel before painting. These panels are attached to an aluminum framework and also need appropriate preparation for the type of topcoat being applied.


Ok, there you have a rather generic outline for the initial steps for a Walldog Mural Project. My next post will describe how I was selected to lead a project for the 2013 "A Hog in Dog Heaven" Walldog event in Kewanee, IL


Saturday, November 3, 2012

Problem=Solution


When I was growing up, my family didn't have a lot of money, so we had to come up with creative and inexpensive solutions. When my dad wanted to build something, he would think about it for a while. Then he would find some paper and a pencil and sketch up a dimensioned drawing of the project.

I saw him do this with something as simple as a birdhouse all the way up to a built-in corner cabinet for our house. With this type of sketch, he could also figure out exactly what materials would be needed for the project build. Using this process, he could think about how to find and or buy the required building materials.

I'm not sure how this influenced my own choices over time, but I do know that I have applied this same process to my ever-evolving design thinking. When I set out to do a new project, I start by drawing a dimensional sketch. Then I look at the most cost effective way to produce what I am planning to build. Once all that is done, I can look at the build versus buy options.

Although I know how to draw up my plans using a pencil and paper, there are much more advanced tools available today. Let me explain the more modern approach to creative problem solving, as it applies to a simple shed project.

Problem= I have too much stuff

Solution= Get rid of stuff
               Increase storage capacity

As I have mentioned in previous posts, I am trying to set up a studio workspace in my basement. My wife and I both paint and we also have a lot of supplies and equipment that we use for mural painting.

We want to clear out some of less used equipment and only have so much space in our garage. So, we looked into putting an 8 x 12 storage shed in our back yard. We went out and looked at the various kits available at the big home improvement stores.

An 8 x 12 storage shed kit with floor costs around $1200. From my research, many of these complete kits come bundled with material that many times are warped or twisted and need to be replaced, thereby increasing cost. All of these kits are made to stay together once built, so if you ever move you have to try and move a large shed or leave it behind and start over at your new place?

So, I decided to do a cost comparison between what the home improvement stores offer and what I could build myself. Just to make it interesting, I thought I would design my shed so that it could be made of bolted together sections that could be disassembled and easily moved on a small trailer. Another advantage of building your own, is the option of picking out the best materials that are available at the building store.

First upDraw the shed.

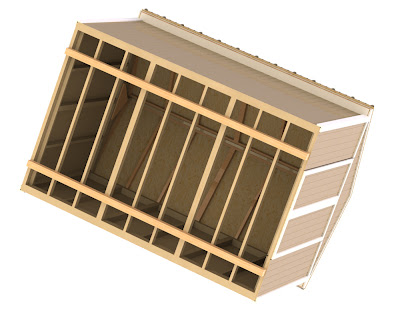
I now use a computer program called SolidWorks to draw my projects. Solidworks is a high-end 3D solid modeler program that allows me do design full-scale and assign materials to each part. There is an integrated program called PhotoView 360, which allows me to render a realistic image of the finished design.

This program basically works in reverse of the traditional mechanical design process. Instead of doing a scaled orthographic projection (front, side and top views), and then trying to figure out the 3 dimensional structure. I design the 3D part or assembly in SolidWorks and then create drawings from the various part files (if necessary). 

I drew up each part of the shed, full-size and fully dimensioned. Then I added the appropriate materials and appearances to each components. Below are renderings of the shed assembly that were generated using PhotoView 360.


Using this software to design my project allows me to rotate to any angle or view, zoom in, hide or make parts transparent. I can then make the typical orthographic projection drawings from the 3D parts because they are already fully dimensioned. Creating a drawing is all drag and drop once the assembly file is built and saved.


I then created an Excel spreadsheet to determine what the overall cost of this project would be. I haven't added in the cost of the metal roof or hardware yet, but you can get the general idea. I can pick out my own materials (which will be straight) and build this shed for at least $500.00 less than buying a take-what-you-get kit. 


Thanks to my Dad for giving me these problem solving skills. They have been quite valuable over the years. Not to mention, I learn a lot on each of these explorations.