Showing posts with label Mural Painting. Show all posts

Monday, October 15, 2012

Arcola "Pop the Top" Walldog Event

Each summer a group of creative artists gather to paint several murals in one or two towns in America. The group is called the Walldogs and it is made up of creative artist from around the globe who get together to promote hand painted exterior wall murals. Click link below to learn more...

thewalldogs.com

I wanted to share some photos of the murals we painted at this year's Walldog event in Arcola, IL.

15 murals painted in just 4 days......June 20th - 24th, 2012


Tuesday, June 19, 2012

Pop the Top Walldog Event, Arcola, IL June 20 - 24, 2012

Well, we are packing up to head down to this Summer's mural event being held in Arcola, Illinois. We will be joining together with approximately 140 of our fellow artists, to paint up another Midwestern town.


 This year there are artists coming from New Zealand, Australia, Scotland, and several from Canada. Arcola has lined up 15 large-scale exterior murals for us to paint during this 4 day event. 

 At this year's event, my wife and I will not be leading a project. instead we will be helping our friends wherever we are needed the most. At last year's event, my wife and I were busy planning our wedding, so we were not able to help paint as much as we like. But this year, we can help as much as possible.

Earlier this year I decided to build a new stereo system for Walldog events. As long as I can remember, I've always loved to listen to music while I work. This of course has carried over to mural painting. So this year I finally pulled out all the stops and decided to build the system I've been thinking about for years. 

If you're not familiar with mural painting or Walldog events, I will explain one of the first steps of the process to try and make more sense of my sound system idea. 

The first night of a Walldog event, is generally set aside to project the art on the wall. We use overhead projectors with the art printed on clear transparencies. Recently, the city hosting the event turns off the street lights in order to make the projected images easier to see. We project and draw the images on to pre-primed white walls. 

 Not sure about you, but when I see a big white wall, my minds starts to tell me to put something on it.

After the projection process, we usually hang around and catch up with old and new friends. I always thought it would be fun to build a surround sound system with an on-board digital projector. I was finally able to find the components to make this idea a reality. So, I spent the last couple of months designing and building my (somewhat portable) audio/video Walldog system. Here is a couple pics of the unit...


 This contraption of mine includes the following features...

 1000 watt Panansonic Surround Sound Home Theater System (5 speakers, sub, amp)

 The system plays DVD's upscaled to near HD, and includes an FM tuner.

An iPod dock built in with controls that show up either on the 7" LCD screen or on the projected image.

Can be hooked up to an iPad to play audio, video, slideshows, YouTube, and Netflix (when WiFi is available).

 Includes a ViewSonic DLP digital projector mounted on a 4-way swivel base so we can project out the front, sides, or back. The projector unit is also mounted on slides so it can be removed and positioned on top of the system.

3-way video control switch to feed the different video sources.

A digital clock built in with dual temp displays....which includes a remote temp sensor for secondary temp readings. I can hang the remote sensor on (or locate it near our wall) to determine how hot the painting surface is.

Ground effects LED lighting and an LED "night light", both with on and off switches.

There is also a 12 volt cigarette lighter jack for cell phone and USB charging when needed?

 All of this enclosed in a perforated steel structure with 4 Monopod legs and four tripod extension speaker mounts.


So, I will be trying to update the blog from Arcola's event with pictures. This all depends on the access to WiFi in the area. And how late I work into the night.

 Till then....

Saturday, January 15, 2011

Mural Themes, They Pick You! Part 2

To continue Part 2 of my post on mural themes, I would like to include a couple more that were quite memorable for me. One of the mural projects brought several major changes to my life, the other was simply an amazing experience.

The first mural project was a Walldog event held in Pontiac, Il during the last weekend in June of 2009. My friends Bill and Jane Diaz along with the City of Pontiac, planned and organized the "Chief City Runs with the Dogs" event. At this Walldog Meet, we were scheduled to paint 18 mural in a span of 4 days. I was asked to be a project leader for one of the murals to be painted during this event. For more on the Pontiac event, see link below...

www.letterville.com/meets/chiefcity/index.html

Early in 2009 I was given my mural subject and asked to develop a mural design concept for it. The subject matter for my mural was the Rodino Square service station and store. The Rodino Square was a popular stop along the original Route 66. It was a family owned and run business that was built up by selling vegetables door to door out of a Model T truck. I decided to work up something in an Art Nouveau style since that would have been in style near the time the family started the business. I worked up a concept for the mural and sent it down for approval. After a few minor changes, I went ahead and finished the final artwork.

All that was left to do was pack up all my supplies right before the event and head down to Pontiac. Those plans were nearly cancelled at the last minute. Days before I was to head to Pontiac, a tragedy struck our family. My Dad had an Aneurysm rupture and had to be airlifted in order to receive emergency surgery. He was only given a 50% chance of survival due to his age and the severity of the surgery. He did survive the surgery but had to be put into a medically induced coma for a week to heal after the surgery.

The week he was to be in the coma recovering was the same week I was scheduled to be painting the mural in Pontiac. During all this I notified those organizing the event and explained the situation to them. They were very supportive and told me that they could find someone to take over the mural project if need be. I spoke with family and friends and together we decided it might be better for me to carry on with the Walldog event as planned. One of my letterville.com friends recommended that I go to the event, paint the best mural I could and then dedicate it to my Dad.

With a heavy heart I did go to the Walldog Meet and followed my friend's advice. It was very comforting to be around a large group of friends who supported me during this difficult time. The main reason I decided to go to the event was that my Dad would have wanted me to be there instead of sitting around a hospital. It's hard to explain the level of Fellowship one experiences at a Walldog event. It's like no other gathering that I can think of!

Here is the Art Concept for the Rodino Square Mural....


While painting one of the Model T cars on this project an idea came to me as to how I could dedicate this mural to my Father. I remember my Dad telling me stories about some of the old cars he had when he was young. One of which looked quite similar to the one on the mural. I decided to paint my Dad's initials and birth year on the license plates of the Model T. That way it had a lot of meaning to me and didn't take away from the original concept.


The completed mural....


The next project is from the last Walldog event that I was involved with. This past summer I was asked to be a Project Leader for the Dog Gone Dandy event that was held in Danville, Il on August 4-7th, 2010. Originally the host and planners of the event asked if I would be interested in painting a mural honoring the celebrities that called Danville home. As plans developed, they eventually asked me to Lead the Balloon Classic project, which celebrated the large hot air balloon event that Danville hosted for many years. Bright colorful hot air balloons would be a great theme to work with, sign me up!

As soon as the project was presented to me, I had the idea that it would be nice to arrange a ride in a hot air balloon for "research" purposes! I started looking into local hot air balloon ride services, and found out that it would be about $900 for the three of us to go up. That would be myself, my significant other, and her 14 year old daughter. I went to work on the mural design and put the ride on the back burner.

I was given a rather huge wall for the Balloon mural and decided I better try and utilize as much of the space as I could. Then again I only have four days to complete the mural and have no idea how much help I would have? The wall I was to paint was a red brick corner of a parking ramp near the main street area of downtown Danville. It was about 29 feet wide and 40 feet tall. Here is the "canvas" I had to work with...


And here is the concept I presented to the organizers of the event....


We then commenced on the monumental task at hand.....


Soon after we started on the project a very nice lady named Wendy walked up and asked if we might be interested in taking a hot air balloon ride? Are you kidding....we'd love to!!! She explained that her friend was a local hot air balloon pilot and if the weather was decent they would take us up very early on Saturday morning. And she also wondered if her and her friend could help with the mural. I thought I had won the lottery or something!

The Friday night before our flight, the balloon pilot caught up with me and mentioned that her good friend was also going to take up his balloon so my fiance's daughter could go up in his balloon and well as one other person. Well, I'm here to say we were up the next morning and our host family drove us out to the launch site. The weather was looking good, we just had to wait for the light ground fog to burn off and we would be ready to load and go.


There was a big crew on hand so we were told to just take photos and enjoy ourselves. The whole process of a balloon launch was very interesting to watch. But the best part was the actual launch and ride......simply amazing!!!!


Many thanks go out to our pilot Donna Carlton-Vish and her husband Don for taking us on this incredible flight in her balloon...Sunny Side Up.

I also need to thank the crew that pitched in and helped complete the mural. We managed to squeeze in a hot balloon ride and complete this huge mural in just 3 and a half days. You might notice in the photo below that I decided to include the balloons that we took our ride in on the finished Balloon Classic Mural!

I am truly grateful that this mural theme came my way and decided I was the right person for the job....I can only imagine what might be up next?


Wednesday, September 22, 2010

Mural Themes, They Pick You! Part 1

A New Year and a New Blog Post....Finally!!!

Since I posted last, I took on a huge mural project at my place of employment, which I will post on in more detail at a later date. I also became a Grampa for the first time and then survived the annual holiday madness. I started this post on mural themes a while back and then got swept away by life, so let's get to it.

This blogs is on Mural themes and how they seem to pick the artist at times? In the past 11 years or so, I have painted several solo murals and attended about 12 Letterhead Walldog events. As far as the murals I've painted myself, the themes are usually selected by they client. Of course there is always the project that is somewhat loosely defined and those tend to allow for some creative theme ideas.

As far as the Walldog events, they can be all over the place, as far as themes and art development goes. I have attended events where most of the art was done ahead of the event by the host and or the local planning committee. Other events send out a packet of research information for each mural and allow the corresponding Project Leader to develop his own original art concept.

What does baffles me sometimes on this topic, is how the host of a large mural event can pick the perfect mural theme for each Project Leader! This has happened at a few of the events that I have been a Project Leader on. So let's look at a few themes that have picked me over the years...

First off, I would like to present a couple of murals that I developed for clients of mine over the years. Just for fun I will post a picture of the first solo mural I did back in July of 2000.

On this particular mural I had seen a picture of a Maxfield Parrish painting in an issue of the Smithsonian Magazine. The painting was for the Ferry Seed Co. and Maxfield used his daughter Jean as the life model for this piece. My friends had recently purchased a small farm at the time and it included a very large white barn. Or in my case, a very large wooden canvas! The barn could be seen for a mile or so and It seemed the perfect subject matter for both the family and the location.


A few years after the barn mural, a dear friend called me in regards to painting a mural on her wooden kitchen floor. Her family was doing a major renovation to their old farmhouse and wanted to do something original on one of the old wood floors. The first thing that popped into my mind was a large fruit crate label painted over most of the kitchen floor. I gave her about 50 or 60 thumbnail images of a variety of old fruit crate art. She picked the Kentucky Cardinal label you see below because it matched the colors she had planned to use throughout the rest of the interior of the home.


This Project was also featured in a How to Paint Floor article in Sign Builder Illustrated Magazine.


Next up, I would like to share a few memorable Walldog mural projects that I have been involved with over the years. For an explanation of all things Walldog, please see the following website...

http://thewalldogs.com

The first Walldog project I would like to talk about was the Jacksonville Walldog Extravaganza which took place in late June of 2006 in Jacksonville, IL. I was chosen to be a Project Leader for the Eli Bridge Company mural. The Eli Bridge Company actually didn't build bridges but were celebrating 100 years in business building carnival rides. The Eli Bridge Co. produced the Big Eli ferris wheel and also the well known Scrambler carnival ride.

During this event, I had the privilege of getting a tour of the Eli Bridge Company headquarters a few blocks away from their mural site. It was like stepping back to the 30's just walking into the building. There was one room large enough to set up and test one of their smaller ferris wheels. There was also another area large enough to set up two complete Scrambler rides.

In the middle of Jacksonville there is a Big Eli ferris wheel that operates during the summer months. On my way out of town I stopped by the wheel and explained the mural project that I had just finished. The operator of the ride was impressed enough by my story to offer me a ride and gave me the longest ferris wheel ride I had ever had. What a great way to finish a great week of painting fun.


In August of 2006, my good friend Kurt Gaber hosted the Brush Bash 2 event in Chippewa Falls, WI. I was in the process of relocating to Vermont for a new job and had some extra time on my hands so I offered to help in any way I could.

The mural painting event was centered around creating a memorial for a tragic accident that occurred in October of 2005. A High school Marching Band Bus accident had injured thirty-nine passengers, and killed five others, including the beloved band director, Doug Greenhalgh. In the early morning hours of Sunday, October 16, 2005, the Chi-Hi Marching Cardinals were returning home to Chippewa Falls, Wisconsin from a marching band competition in Whitewater, WI.

The center piece of the Memorial square that was dedicated for this event was to depict the history of Chippewa Falls. A visual timeline was to be painted finishing with a Marching band mural honoring those lost in the accident. I was chosen to paint the Marching Band Mural.

I had a great team of painters including my dear friend and incredible portrait artist, Tatiana Zank. Work on this mural was very emotional for my entire team of painters. As we worked, local residents affected one way or another by the accident were most often in tears behind us. It was a challenge to hold back our own tears as we completed this visual memorial....


You can see more of Tatiana's amazing work at... http://www.tatianazank.com/


I have a couple of other themes I would like to share, so I will include those in Part 2 of this post. Until Then, take care...

Tuesday, August 17, 2010

Mural Painting Equipment

Well, I finally have the energy after the Danville, IL Walldog event to create my next post. To all of the talented Balloon Classic mural painting crew, I owe you a huge THANK YOU! We managed to pull off an incredible amount of work in a few days, and the mural turned out better than I could have expected.

During the Walldog event in Danville, I was also treated to a Hot Air Balloon ride, but I'll talk more about that in a future post. Here is a picture of some of the crew that helped on the Balloon Classic wall.....


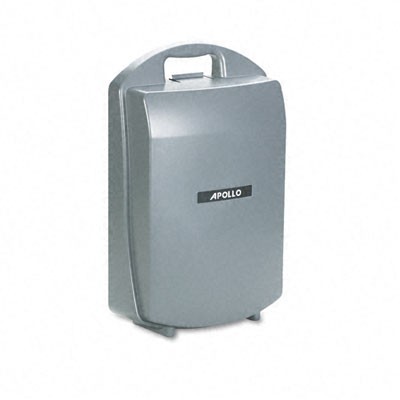
In this post, I was hoping to present and explain some of the equipment required to paint a large scale exterior mural. In my last post I mentioned the technique of printing copies of the art on transparencies so they could be used to project on the wall. In order to do this you need a good overhead projector. I use an Apollo 4000 overhead projector.


The projector has the following features:

• Combines elegant boardroom styling with top projection quality
• Features a reflective anti-glare projection stage
• Three element vari-focal lens ensures sharper focus and picture clarity
• Provides 2,000 lumens light output
• Folds to flat position in protective hard shell case for easy travel
• Includes molded handle and internal storage for power cord and transparencies
• Lamp changer prevents delays by instantly positioning a fresh lamp
• Reflective light transmission for superior light output
• EYB replacement lamp

I have used several different types of overhead projectors, but this is the best one I have found...so far!

Next up, you will need something to set the projector on while you project the image onto the wall to be painted. A few years ago I attended a Walldog event where I sketched up an idea for a projector stand and a local welding shop built one for us. They choose to built it out of square steel tubing which worked well but was a bit heavy to carry up a ladder to project off a roof. You never know where you will end up doing murals! Here is a picture of the steel version....


I decided I needed a light weight version of the projector stand, so I re-built it using aluminum tubing with a stainless steel projector platform. The entire stand screws apart at a couple different points, so it breaks down easy and fits into my car if need be. Here it is in the disassembled mode.


Here is the projector stand fully assembled...


Here is the projector and stand set up...


The main tube adjusts up by loosening the two set screws on the lower back side. The black bar sitting on the base, is a counterweight to help keep the stand weighed down and prevent tipping backwards. The four feet on the base adjust up and down which helps level the projector on curved surfaces (streets).

Next up you will need a good collection of brushes (fitches for rough walls) and a case to carry them in. I use a D-Flite polished Aluminum All-Purpose box. Which can be found here... http://www.d-flite.com/index.htm


Next up you will need a bunch of straight edges, levels, halogen lights for night work.......well maybe a list of stuff would help here...


• artists acrylic paints in a selection of colors that corresponds to colors in your preliminary design
• empty containers with lids—coffee cans, cups, etc for mixed colors
• primer (gesso)
• rollers
• roller pads
• extension handles for your rollers
• rags and/or paper towels
• drop cloths
• buckets
• brushes in many sizes
• yardsticks
• masking tape
• painting palettes or trays for mixing colors
• metal scrapers to clean dried paint off palettes
• stir sticks
• wire brushes
• brooms and shovels
• eye protection (goggles)
• ladders
• scaffolding
• paint spraying system
• air compressor
• milk crates or other sturdy boxes to store paint cans
• sun/rain protection system
• A shade tarp that can be rigged to scaffolding with a telescopic adjustable frame.
• sunscreen
• sunglasses
• sunhat,
• bug spray
• work area or table
• solvent disposal/recycle cans & funnel when there's no practical place to dispose of used solvent.
• chalk lines with extra powder
• tape measures
• plumb-bob line
• rolls of saran wrap for temporarily storing/sealing roller covers that might be needed later.
• garbage bags
• recycle bins

Did someone mention spray guns? I have a couple different touch-up guns that I use. One is the el-cheapo deluxe $40 version you find at the local hardware or home builder supply stores....that would be the blue one in the picture. The other is the SATA Centennial edition with gold plating and even a gemstone in the handle. The SATA model is mostly reseved for high-end automotive type finishes. It features a digital air pressure regulator.


And the guns have their own box with more space for non-air brushes....


For the Balloon Classic wall, we needed to reach to the top of the 40 foot high wall, so we used a telescoping boom lift and a scissors lift. I wish I had taken a few more pictures of the lifts in use on the wall but I was a bit busy painting at the time. Here is the boom lift we used and a couple of pics of lifts to get the point across.


So, load it all up and we'll see you at the next Walldog event!