Wednesday, August 12, 2020

Punky Manor - Vintage Stock Car - Tribute Build

The Builder


I have learned a lot during the process of building the Punky Manor Tribute Torino over the last 5 years or so. For about 45 years, I have been working on cars as a backyard, weekend mechanic, but I am not a professional by any means. I have spent the last 25 years or so working in Product Development as well the Prototyping industry. Somewhere along the line I did acquire a Bachelors Degree with a concentration in Industrial Design and also put in a couple of years of Mechanical Design at a Tech School.

My only other complete car project was the restoration of a 1969 Chevrolet Camaro that I bought from my Sister back in 1980. I did some of the fabrication on the car and had some help with the roll cage and frame updates. We did put a narrowed rear end and full wheel tubs in it. I did most of the body work and painted the car about 30 years ago.


On the Torino project I have had to completely learn some fairly complex fabrication techniques. The Frankland Quick Change Rear end was the first of those learning sessions. I bought a vintage Frankland that came out of a Sprint Car. The center section was offset to the left side quite a bit and there was no way to mount this rear end to the Torino's suspension.

I ended up going to the local Ford salvage yard where I picked up a 1972 Mercury Montego 9" Ford donor rear end. I had the rear end housing sandblasted and then welded a heavy duty metal jig in place so nothing would move when I cut the brackets off. I then had to carefully cut off the metal thickness of the old rear end tube in order for the brackets to fit over the new axle tubes. I located the factory brackets on the Frankland quick change tubes and then welded them in place. And finally, I cut the spot welds off the location jig and removed the fixture from the quick change.


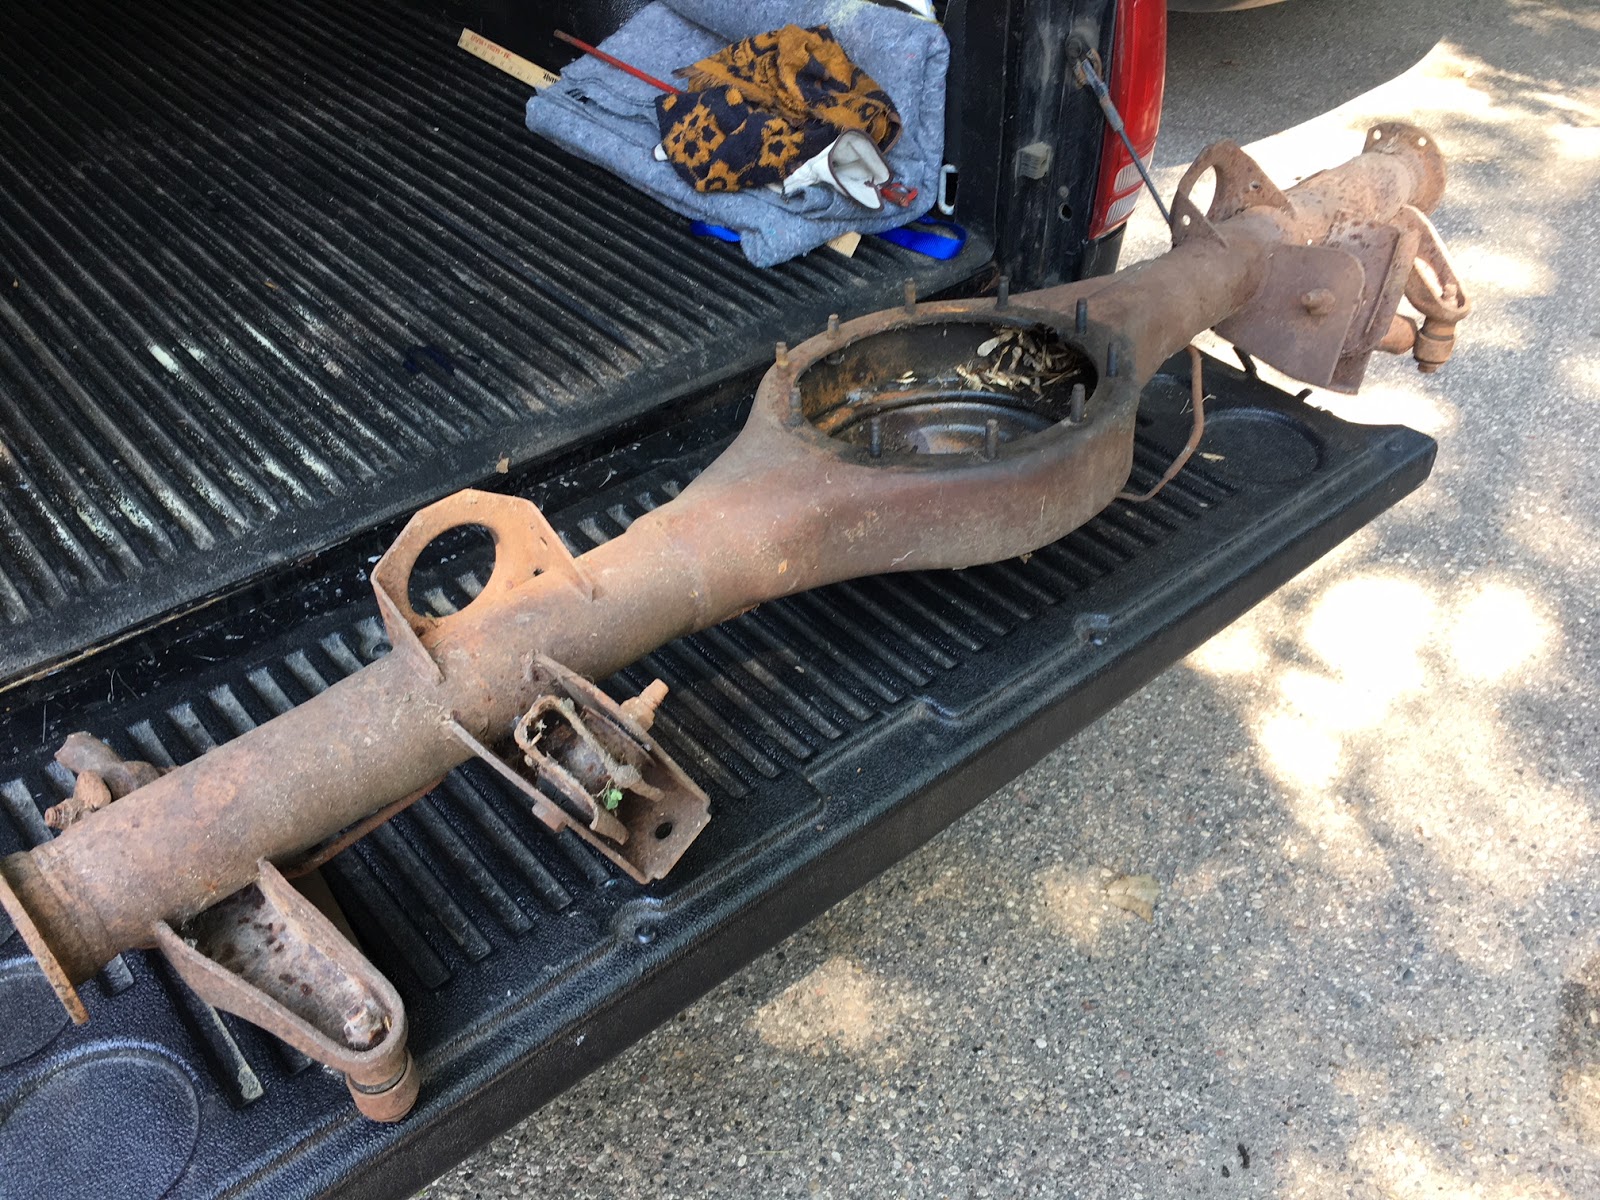
After spending numerous hours repairing the rear end frame mounting locations on the Torino, I installed the Frankland quick change in the race car.


My next learning experience was installing a complete brake system. I had done some minor brake work when I built the Camaro, but the Torino needed a complete brake job. I bought a rear disc brake conversion kit for the Frankland quick change and installed that. 


When I took ownership of the Torino, there was only a partial caliper set up on the driver side front wheel. The rear brakes were completely missing. There were some old brake lines still in place but they were either cut off or very rusty.

I ordered a new brake master cylinder and had to learn how to bench bleed that before I could install it in the car. Through some other research I figured out that Nickel Copper brake lines were the way to go. I ordered up a few brake line tools and a flaring tool kit. The first flaring tool was poorly made so I ordered a completely different style tool that worked much better. 

After installing all the new brake components (front and rear), I used 1/8 inch wire to mock up the bends in each line. I then had to flare all the ends of the brake line. 

Upon trying to bleed the rear brakes, I discovered that the proportioning valve that I bought was not working correctly, so I ordered and installed a better quality part. 


The next challenge coming up is the drivetrain. During one of our engine test fitting sessions, we measured the length of the driveshaft. I went down to the local Ford salvage yard and found a "new" (1973 full-size Ford) driveshaft. The safety rules require that each race cars driveshaft must be painted white and have the number painted on it. I hand lettered the car number on both sides of the driveshaft using lettering enamel.


The bigger challenge is trying to get the transmission mounted to the engine and making it functional! I have covered this a bit in previous posts, but I am now at the point where I have to make it work.

I guess I could include a picture of my first attempt at setting up the transmission and hydraulic throwout bearing...


About 2/3's of the parts on the white paper above had to be returned. I am currently waiting for the second wave of parts, so I can try it all again! I think I will expand on that adventure in my next post.  Take care for now.

Saturday, August 1, 2020

Punky Manor - Vintage Stock Car - Tribute Build

The Process - Continued


Once again I find myself trying to figure out what should come next on the Punky Manor Tribute Torino build. I know I need to run brake lines through the car and back to the Frankland quick change rear end. But I need to complete a couple of other tasks before I can do that.

Since I installed rear disc brakes on a car that originally had discs brakes on the front and drum brakes on the rear, the stock proportioning valve will no longer work. I decided to install an adjustable brake proportioning valve next to the drivers seat, so I can adjust the rear brakes with my seat belts on.

Before I install the brake lines I need to paint the interior of the car semi-gloss black. If I am going to paint the interior black, I might as well paint the trunk area, the engine area and the bottom of the car.

So, I masked off everything that I didn't want black paint on, including both the car and the garage. I put on my painting suit and dumped on about a gallon of semi-gloss paint.

Here are some pics of that process:


Vintage Dirt Track Race Car Build


Now that the interior, chassis, and engine bay are all painted black, it's on to the next project. Below is a before image of the engine bay and front suspension. It is pretty easy to see that the front suspension and brakes need a complete rebuild.  


I went ahead and ordered all new front disc brake replacement parts including; rotors, calipers, bearings, dust caps, brake pads, and flexible brake lines. For good measure, I also ordered upper ball joints, tie rods, and new coil springs.


In the 5 years that I have been working on the Torino I never noticed that there wasn't any way to mount front shock on this race car. With the addition of adjustable weight jack components (where the shock mounts originally were), there is no place to mount front shocks. I can only wonder how this car was raced in the past with no front shocks!

There was very little room to actually fit a front shock down to the lower control arm with all the other components and extra wide tires. I ended up having to fabricate both the upper and lower shock mounts. I welded the upper shock mount to the front engine bay roll bars, and bolted the lower mount to the torsion bar mount holes.


Next up, I think I will need to run all the new brake lines. I also have to start figuring out how to get the drivetrain assembled and installed in the race car. Take care for now.

Wednesday, July 8, 2020

Punky Manor - Vintage Stock Car - Tribute Build

Three steps back for each step forward - The Process


When I originally acquired the Tribute Torino, I thought it was going to be a pretty straight forward build. Just clean things up a bit, replace a few panels and then paint it up. After hundreds of hours spent on this labor of love, I am still trying to figure out what to do next.

Last year I spent about 8 months just fixing the interior, floor, trunk area, and engine compartment. Earlier this year, I started to think that all I had left to do was replace most of the body, prep for paint, and then get the main colors sprayed on. Once again, I miscalculated how many other things needed to be addressed before I could put all the new body panels on. 

I decided to start from the back of the car and work my way forward. When I initially brought the car up north to put it in storage, we ended up damaging the only good corner of the car. We were rolling the Torino off the car transport trailer (with no brakes) and it missed our tire blocks and instead crashed into an 8" X 8" wooden post. This collision flattened out the (hard to repair) rear quarter section just above the drivers side tail light. 


Since I have not replaced many entire car bodies before, I decided to start with the smaller patch panel on the drivers side rear quarter and work my way up from there. I picked up the upper portion of the rear quarter at a Ford salvage yard over in Hastings, MN. off the blue/gold car below.


Above is a photo of all the panels I have purchased over the last 5 years. I have removed all the old paint, cut off all the dead weight, and then shot the panels with white primer.

I first marked off where the new patch panel was going to be located on the race car. I used a cut-off wheel to cut the old metal off the car, then welded in the patch panel. I used a pneumatic punch/flange tool to create the overlap seam and punch "spot" weld holes.


Next up, I started in on the worst side of the car...the passenger side. Apparently the whole passenger side of the car had been through some tough times and been through some questionable repair sessions!


Finding good sheet metal for this 40+ year old car was pretty challenging. I was able to find two different passenger side rear quarter panels and then weld them together to make one full quarter.


After installing the new rear quarter, I made a paper pattern and then cut the wheel opening large enough to fit the McCreary racing tires. I used a homemade tool to roll a 1/4" lip around the wheel opening.


Next up I had to replace both of the rocker panels. I guess the best way to show how poor of condition the rockers were in would be to just show a couple images of them on the car.


Yes, the picture above is actually Great Stuff spray foam that someone pumped into the rocker panel.

The new rockers were carefully located, welded on, and then I tack welded tabs on to hold the doors in place for test fits.


Well, I would like to say that I am now ready to weld the doors and fenders on and finish all the body work, but that is not the case. I need to install a new rear brake proportioning valve and decided to place it next to the seat, so it is easy to adjust. Before I weld the drivers door on though, I need to run the rear brake lines through the interior of the race car. Before I run the brake lines, I really should paint the interior, the underside, the engine bay, and the trunk area with semi-gloss black paint. 

So I need to perform about 20 or 30 more steps before I can finish installing the body panels. I will include a couple photos here with the body panels hung on the car for a fit test.


Thanks for stopping by and take care until next time! 

Friday, June 19, 2020

Punky Manor - Vintage Stock Car - Tribute Build

Fabrication - Coming to a close...


I was recently walking around the Tribute Torino when I started to count the custom fabricated parts that I have built and installed. I quickly went up to 50 different parts on just a quick inspection of the interior. This made me wonder, how many custom fab files do I have on my computer? I just did a tour through the master Torino folder on my computer and came up with 130 separate fabricated part files. I'm sure I have a few more than that floating around on portable thumb drives as well.

Having to create all these custom parts has helped me me develop a fairly efficient fabrication process. Here is the basics. I do a quick paper pattern, which I cut out or just rub over the mating part, or I just draw from scratch using a 2D drawing program. The next step is to vectorize (or create an outline file) of the paper drawing. This is done by scanning the drawing into my computer at 100% scale. I then bring the image I scanned into a program called Adobe Illustrator. In Illustrator, I use the drawing tools to create a 2D outline of the part which can then by cut out on a laser, CNC controlled plasma cutter, or a CNC router. 

Perhaps I can better explain the fabrication process using a part from the "Ford" toploader 3-speed transmission. The transmission for this project has provided me with several challenges along the way. The following description is for just one piece of that puzzle. The part I am highlighting here is the bracket that will hold the shifter on the transmission.

But first I need to explain why a custom part was required. Through a co-worker, I purchased a vintage 3-speed Spark-O-Matic shifter. The shifter was purchased back when 10,000 Auto Parts sold off their inventory and shut down the business. Apparently they used to take certain products out of their original boxes and vacuum wrap them to cardboard so that customers could see what they were purchasing. The store name and date of this particular wrapping job were written on the back of the package. 


So this shifter is about as period correct as I could hope to find. A hurst shifter would be nice, but this is what I had to work with. As you can see in the photo above, there are various "universal" fit brackets included in the kit. As this is going on a dirt track race car, I wanted the shifter to be mounted as solidly to the transmission as I could get it. 

I started by laying out various paper patterns to figure out the correct bolt pattern. I then created several different pattern versions trying to find the most secure way to attach the shifter lever to the mounting holes on the transmission. 


The black parts above were my first test pieces in plastic. Once I determine which paper pattern is fitting the best, I use that vectorized line drawing to cut and bend a plastic version using the same thickness as I intend to cut later in steel.  


Finally, I use a CNC controlled plasma cutter and a hydraulic press brake to bend the mild steel version into the correct shape. Here is the final metal version bolted in place.


I fabricated my own battery box using the method I described above. These boxes are available at most any high performance or racing parts suppliers and are fairly inexpensive. Most of the new ones come with a lot of round holes in them, which would not have been done or available back in the mid 70's. So I made several different versions until I decided on the x-brace style. I think it ends up looking more like something that would have been around in 1974 or a factory battery box.


Below is an Adobe Illustrator 2D drawing of the dash panel and gauge bezel. 


The finished dash gauge panel (below)...this one ended up in a different configuration than the drawing above. More often that not, several different designs are explored until I find the best fit. In this case the steering wheel drove where to locate the tachometer.


Here is both the gauge panel and the dash panel being test fitted in the race car.


I did this same process on over 100 hand fabricated parts over the last few years. I did a count recently and came up with over 750 individual computer files related to the 100+ parts produced. 

Here is a 2D drawing of the rear wheel tub side panel...


And here is the fabricated part installed in the race car...


And here is a shot of the main folder for the Torino Tribute build. Pretty much all of these folders contain more folders of part files, images, reference documents, diagrams, etc.


Next up, I hope to start showing some of the body work that I have been working on. I most recently have been ordering all the parts to rebuild the front suspension. Until then, take care.